5 Easy Metalworking Projects You Can Do This Weekend
Try five easy metalworking projects you can finish this weekend, from wall hooks and shelf brackets to a plant stand and tool holder.
There is something hugely satisfying about turning a plain piece of metal into something useful. You do not need a massive workshop or years of experience to get started either. With a few basic tools, some affordable materials and a free weekend, you can complete a project that looks great and genuinely improves your space.
The best part is that these projects are practical, beginner friendly and quick enough to finish in a day. Some involve simple cutting and drilling, others give you a chance to practise basic shaping or welding. Pick one that suits your setup and skill level, then enjoy the process of making something with your hands.
Here are five easy metalworking projects you can do this weekend.
1. A simple steel wall hook rack
A wall hook rack is one of the most useful things you can make, and it is a brilliant beginner project. It can live in a hallway, utility room or workshop, holding coats, bags, keys or tools.
Start with a length of flat bar steel, roughly 30 to 60 centimetres long depending on how many hooks you want. You will also need either short steel rods that you can bend into hooks, or a set of sturdy bolts which can act as simple pegs.
Mark your hook positions evenly across the bar. Drill two mounting holes near the ends. Then attach your hooks. If you are using rods, you can heat and bend them, then weld them in place. If you are using bolts, you can drill holes and secure them with nuts on the back.
Once everything is fixed in position, clean up the edges with a file or flap disc. Finish it with spray paint, a clear coat or a simple wax finish to prevent rust.
2. A small outdoor fire poker
A fire poker feels like a classic metalworking project, but it is surprisingly simple. It is also a great excuse to practise bending and shaping, especially if you have access to a heat source like a propane torch or a small forge.
You will need a round steel bar, around 8 to 12 millimetres thick. Cut it to a length of roughly 80 to 100 centimetres. Clamp the bar in a vice, then heat one end and bend it into a small hook shape. This lets you pull and rearrange logs easily.
If you want to add a bit of style and grip, you can twist the handle section. Heat a section near the top, clamp the lower portion and use pliers or a wrench to twist the hot metal. Even a simple twist makes the final piece look more intentional.
Brush off any scale, smooth the sharp edges and finish it with a light oil. If you heat the metal slightly and rub oil into it, you can create a dark, rustic finish that works beautifully for fire tools.
3. Angle iron corner shelf brackets
If you want a project that looks professional and adds instant practicality to your home, make a set of corner shelf brackets. These are sturdy, simple and quick to produce, especially if you make more than one set at the same time.
You will need angle iron, plus screws and wall plugs for mounting. Decide on the depth of your shelf, then cut two identical pieces for each bracket. A common size is 20 centimetres for the wall section and 20 centimetres for the shelf section, but you can adjust based on your shelf.
To make the bracket shape, you can either cut and weld two pieces together, or cut one longer piece and create a simple mitred join. For beginners, welding two pieces at a right angle is often the easiest option.
Mark and drill your mounting holes on both arms of each bracket. One arm will mount to the wall, the other will secure to the underside of the shelf. Smooth all edges carefully, as cut angle iron can be sharp.
Finish the brackets with matte black spray paint, a clear coat or another durable metal paint. Once mounted, they give even basic wooden shelving a clean, industrial look.
4. A minimalist metal plant stand
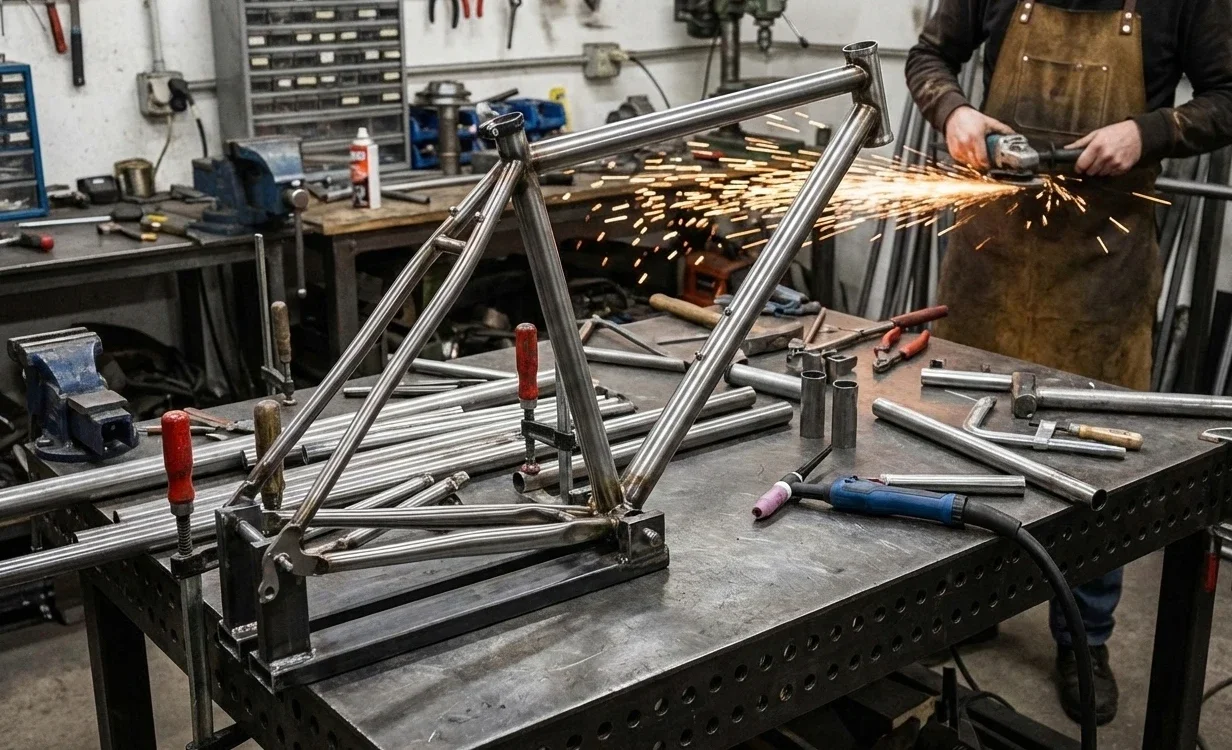
A metal plant stand is the kind of object that looks like it belongs in a design magazine, but it is very achievable. It is also a great project if you want to practise basic welding and measuring accurately.
Square tubing works well for this, but flat bar is also fine. Decide on the height you want, then cut four legs of equal length. A simple design includes a square or rectangular top frame with cross braces for strength.
Start by tacking everything together. Tack welds hold the shape so you can check for wobble and adjust before committing to full welds. Once you are happy, finish the welds and grind them down if you want a cleaner, more seamless look.
If you want the top to be more stable, you can weld on a small steel plate, or create a ring that the plant pot sits inside. For an even simpler option, just weld a square frame and let the pot sit on the cross braces.
Paint the finished stand or apply a clear coat to keep the metal protected. A plant stand is also a great project for experimenting with finishes, from satin black to a raw industrial look.
5. A magnetic tool holder strip
This project is ideal if you want something useful without welding. A magnetic tool holder keeps your most used tools organised and easy to reach, and it can be mounted in a workshop, garage or even a kitchen for metal utensils.
You will need a strip of steel flat bar and some strong neodymium magnets. Cut the bar to your desired length, usually 30 to 60 centimetres. Drill two mounting holes near the ends so you can screw it to the wall.
The magnets can be attached behind the bar using a strong epoxy adhesive. Position them evenly across the back, then clamp them while the epoxy cures. Once mounted, the tools will stick to the front of the steel bar.
Before you install it, clean and smooth the edges. A quick paint job can make it look tidier, but it also works well in a raw finish. Just make sure you mount it securely, as a fully loaded tool strip can get heavy.
One quick safety note. Neodymium magnets are extremely strong, so handle them carefully to avoid pinching fingers and keep them away from sensitive electronics.
A few safety basics before you start
Metalworking is fun, but it rewards careful preparation. Wear eye protection at all times, especially when cutting and grinding. Use ear defenders when needed. Keep gloves handy for handling sharp metal, but avoid wearing gloves near spinning tools where they can catch. Always clamp your work securely and work in a well ventilated space, particularly if you are grinding, painting or using chemicals.
Final thoughts
Metalworking does not have to mean complex fabrication or expensive equipment. These weekend projects let you build confidence quickly, and each one teaches you useful skills like cutting accurately, drilling clean holes, smoothing edges and applying a solid finish.
Start with the simplest option and work your way up. Once you have made one project, you will probably find yourself looking around your home thinking about what else you could build. That is how the best hobbies begin, with one small project that makes you want to keep going.
Stay up to date with our latest ideas!