15 DIY Cheap Ceiling Ideas for Budget Makeovers
Discover 15 affordable DIY ceiling makeover ideas to transform any room. From paint to panels, create stunning ceilings on a tight budget!
Look up! When was the last time you really noticed your ceiling? Most of us forget about that fifth wall hovering above our heads, yet it holds incredible potential to transform any room from bland to brilliant. If you're staring at boring white drywall, dated popcorn texture, or water stains that tell stories you'd rather forget, you're not alone. The good news? You don't need to hire expensive contractors or blow your savings to create a ceiling that makes people stop and stare. With some creativity, basic tools, and a weekend or two, you can completely reimagine your overhead space. Whether you're dreaming of rustic charm, modern elegance, or something uniquely you, these budget-friendly ceiling makeovers will prove that stunning design doesn't require a fortune. Ready to give your rooms a whole new perspective from the top down?
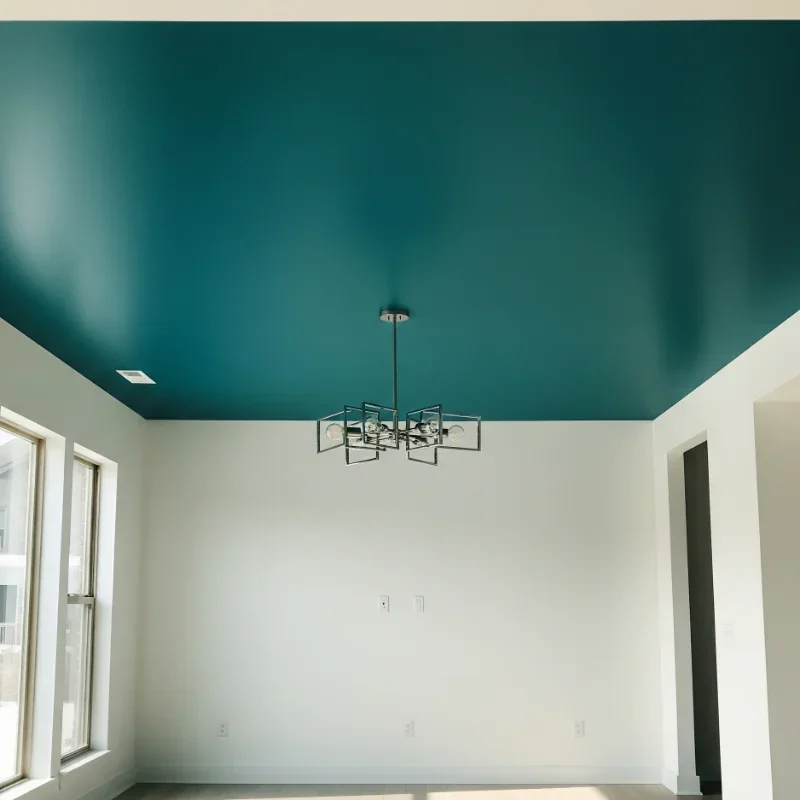
1. Paint Your Ceiling a Bold Color
Who says ceilings must be white? Breaking this outdated rule opens up a world of design possibilities that cost less than a nice dinner out. A gallon of quality paint runs about $30 to $50, yet it completely transforms your room's atmosphere. Dark colors like navy or charcoal create intimate, cozy spaces perfect for bedrooms or media rooms. Light blues mimic the sky, making rooms feel taller and more open. Consider painting your ceiling the same color as your walls for a sophisticated, enveloping effect that designers call "color drenching." The painting process itself takes just a weekend, though your neck might complain afterward! Use a roller with an extension pole to save your shoulders, and don't forget to tape off edges carefully. This simple change delivers maximum impact for minimum investment, proving that sometimes the best makeovers come from a can.
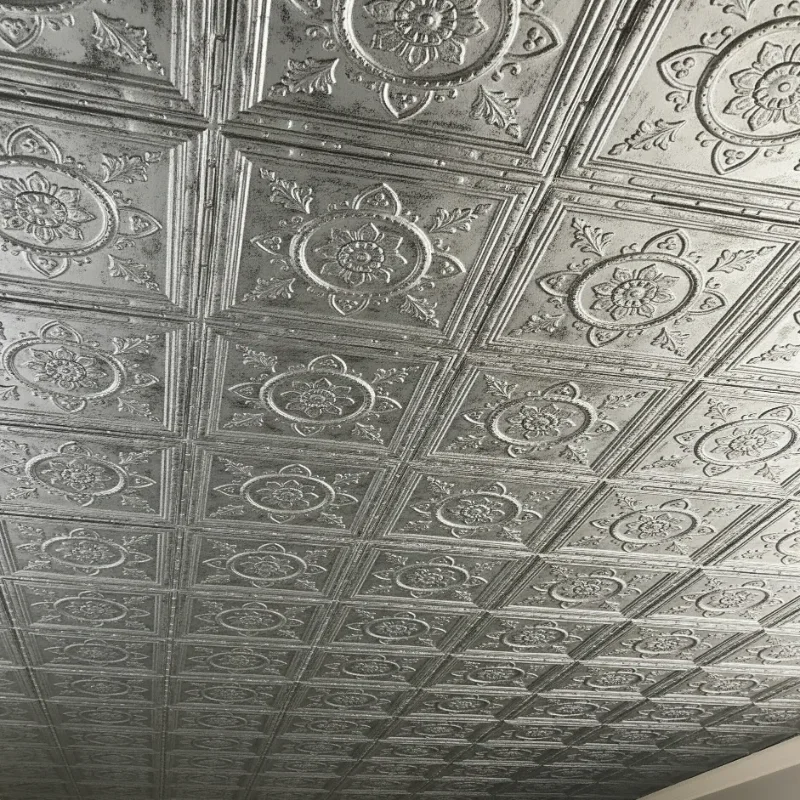
2. Create Faux Tin Ceiling with Foam Tiles
Remember those gorgeous pressed tin ceilings in historic buildings? You can recreate that vintage elegance for about $2 per square foot using foam ceiling tiles! These lightweight tiles come in countless patterns, from Victorian florals to Art Deco geometrics. Installation couldn't be simpler: just apply adhesive and press them onto your existing ceiling. No special tools, no mess, no professional help needed. The foam material also provides bonus insulation and sound dampening, making your space quieter and more energy-efficient. Paint them metallic silver, copper, or bronze for authentic tin ceiling vibes, or go bold with unexpected colors. They're perfect for covering imperfections like cracks or water stains without expensive repairs. You can even create accent areas by tiling just a portion of your ceiling, like above a dining table or bed. Your guests will never guess these stunning architectural details cost less than takeout for four.
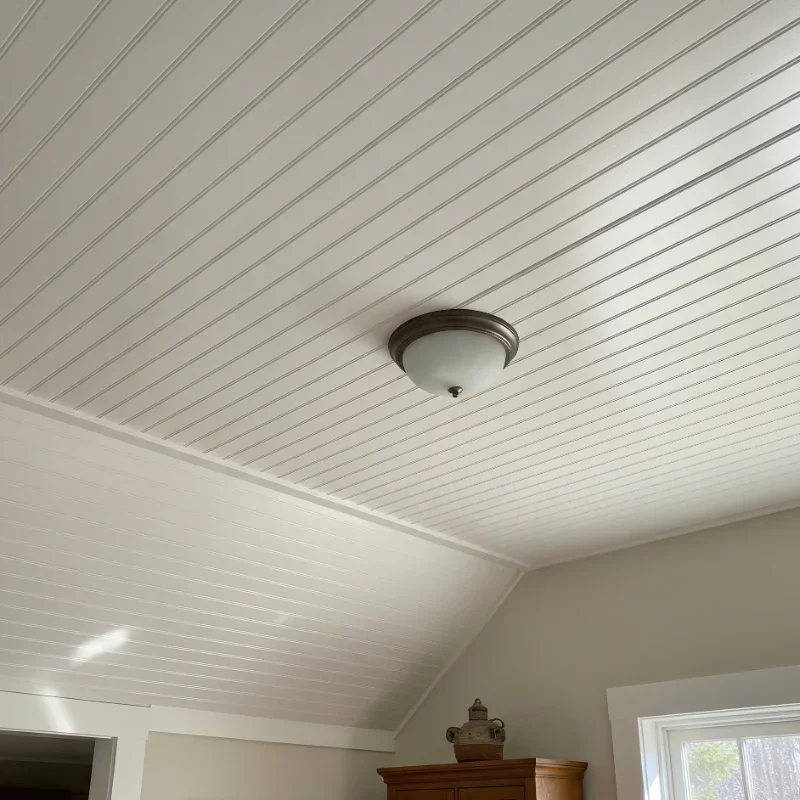
3. Install Beadboard Panels for Cottage Charm
Transport your home to a cozy seaside cottage with beadboard panels that scream casual elegance! These tongue-and-groove panels cost around $20 to $30 per sheet and cover significant square footage quickly. The vertical lines draw eyes upward, making low ceilings appear higher while adding delightful texture. Installation requires basic tools: a saw, nail gun or hammer, and some liquid nails for extra security. Paint them classic white for that authentic coastal feel, or try soft pastels for a shabby chic twist. Beadboard works beautifully in bathrooms, kitchens, and porches where moisture might damage other materials. The panels hide imperfections like a dream while adding architectural interest that looks far more expensive than it is. Mix beadboard with painted sections for visual variety, or run it halfway up walls too for a cohesive look. This timeless choice never goes out of style and actually increases your home's value.
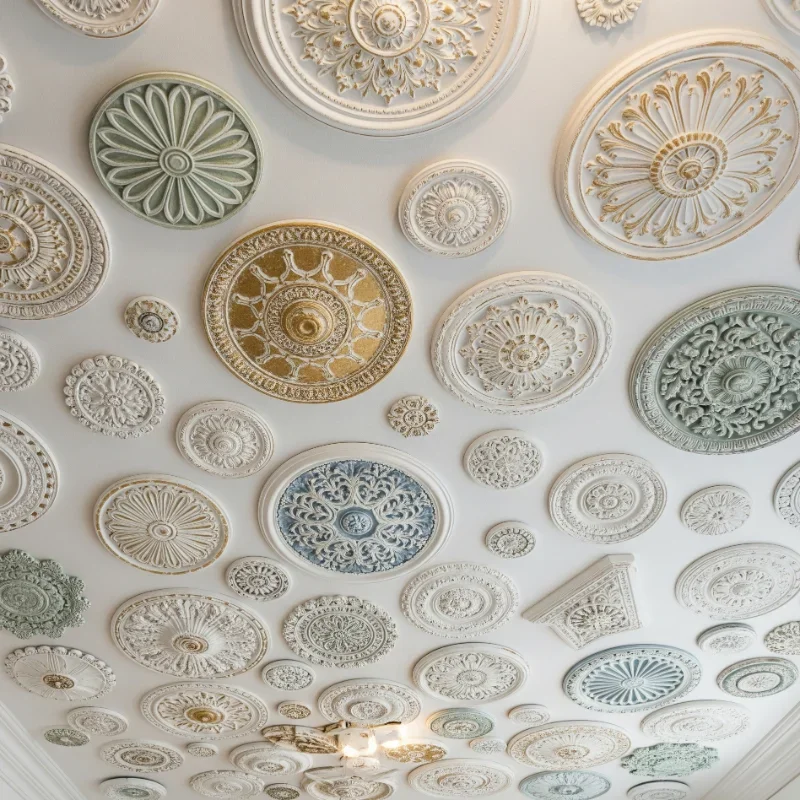
4. Apply Decorative Ceiling Medallions
Turn your ceiling into a work of art with decorative medallions that cost less than a fancy coffee maker! These circular ornaments, traditionally surrounding light fixtures, now come in lightweight polyurethane for about $20 to $100 each. Choose from intricate Victorian designs, simple modern circles, or anything in between. Installation takes minutes with construction adhesive, yet the impact feels like you hired an expensive decorator. Paint them to match your ceiling for subtle elegance or use contrasting colors for dramatic focal points. Don't limit yourself to just one; create patterns with multiple smaller medallions for a unique gallery effect. They work magic in dining rooms, entryways, and bedrooms where you want to add sophistication without overwhelming the space. Combine medallions with interesting light fixtures for a layered look that draws eyes upward. Even renters can use temporary adhesive versions that won't damage ceilings when it's time to move.
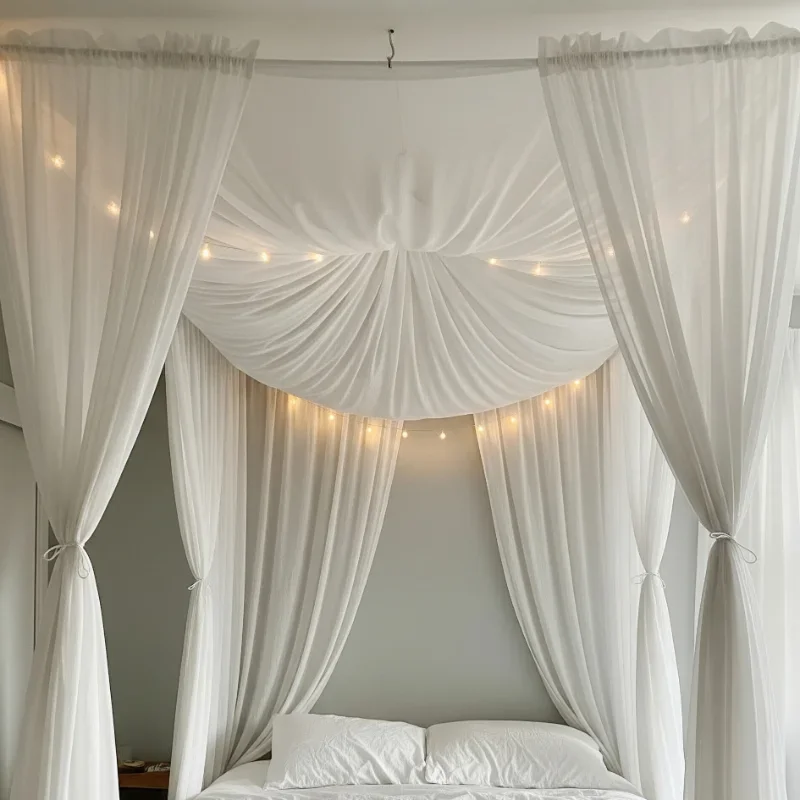
5. Use Fabric for a Soft Canopy Effect
Transform stark ceilings into dreamy cloudscapes using inexpensive fabric that creates romance and warmth! Lightweight materials like muslin, tulle, or even flat sheets cost mere dollars per yard yet deliver five-star hotel vibes. Attach fabric using removable adhesive strips, cup hooks, or a simple wooden frame system you can build for under $50. Drape loosely for a billowing effect or stretch tight for a clean, modern look. This technique works magic in bedrooms, creating a cocoon-like atmosphere perfect for relaxation. Choose sheer fabrics to maintain brightness while softening harsh overhead lighting. Add string lights behind translucent fabric for an enchanting starry night effect. The fabric also improves room acoustics by absorbing sound, making spaces feel more intimate. Change fabrics seasonally: light linens for summer, rich velvets for winter. Best part? When you're ready for something new, just swap the fabric without any permanent changes to your ceiling.
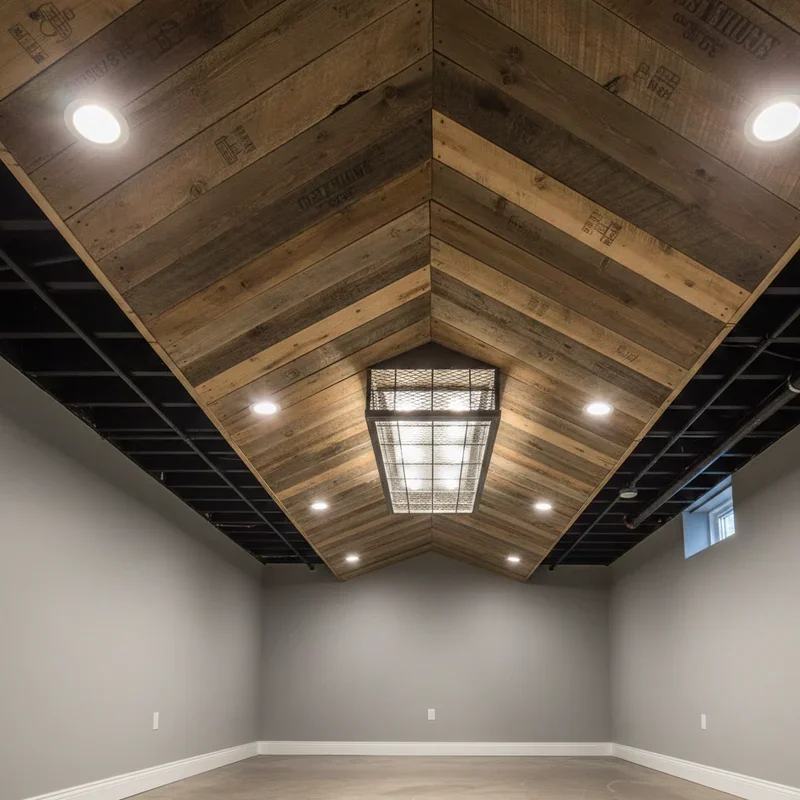
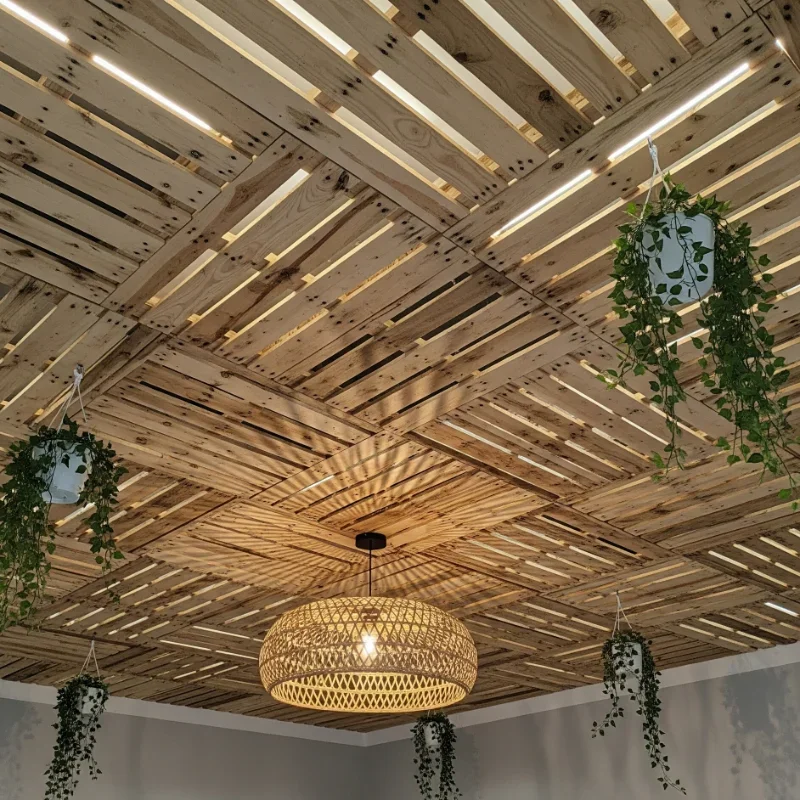
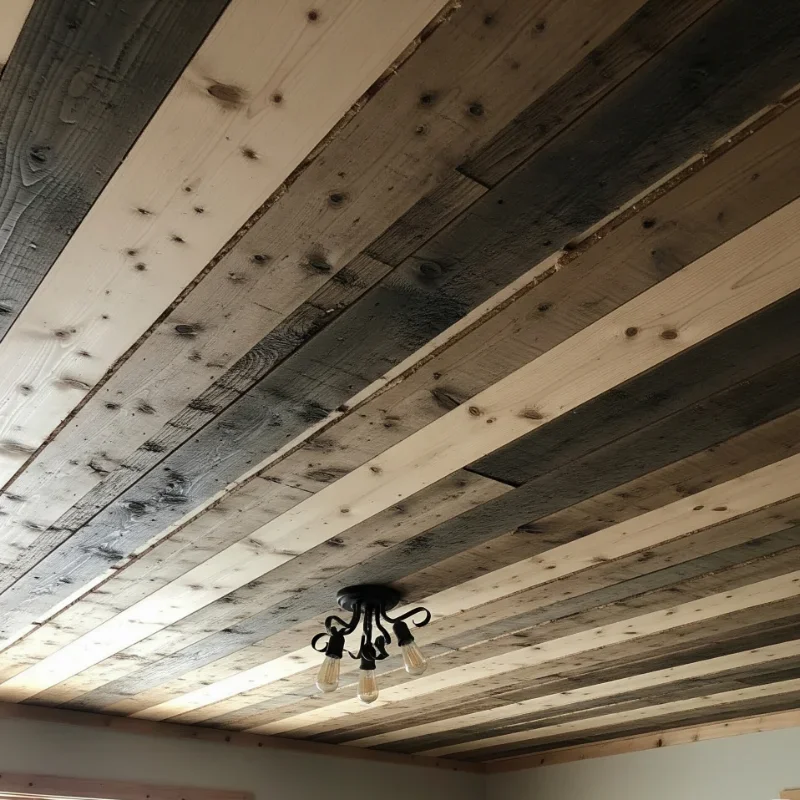
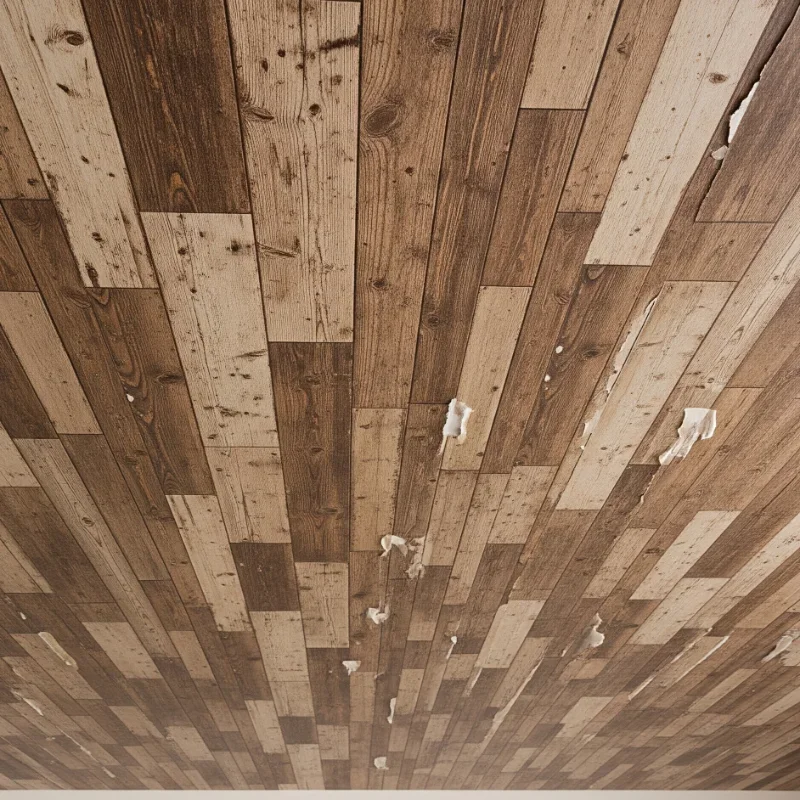
6. Add Wood Planks for Rustic Appeal
Nothing beats the warmth and character of wood planks overhead, and you don't need to raid a barn to get that look! Thin wood planks or even laminate flooring pieces work perfectly at a fraction of solid wood's cost. Expect to spend $2 to $5 per square foot for materials that install easily with adhesive and finishing nails. The natural grain patterns create visual interest while making rooms feel cozy and grounded. Arrange planks parallel for a classic look or try herringbone patterns for modern sophistication. Whitewash or pickle the wood for coastal farmhouse vibes, or go dark for dramatic industrial style. This treatment works especially well in rooms with poor ceiling conditions since planks cover everything. The added texture makes large rooms feel more intimate while maintaining an open feel. Mix wood tones for an eclectic look or keep it uniform for timeless appeal.
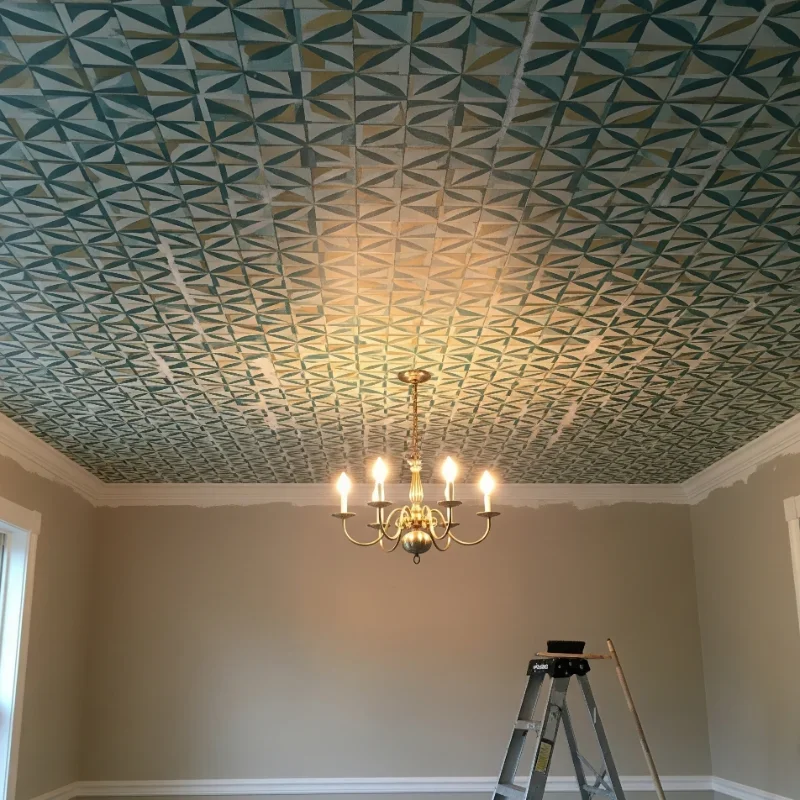
7. Try Wallpaper on Your Ceiling
Flip design conventions upside down by papering your ceiling instead of your walls! Modern peel-and-stick wallpapers make this once-daunting task surprisingly manageable, costing $30 to $60 per roll. Choose from thousands of patterns: subtle textures, bold geometrics, whimsical clouds, or even photorealistic skies. The application process requires patience but no special skills, just a smoothing tool and steady ladder. Wallpaper hides imperfections better than paint while adding personality that plain ceilings lack. Use busy patterns in small spaces like powder rooms where they won't overwhelm, or subtle designs in bedrooms for serene sophistication. Metallic papers reflect light beautifully, brightening dark rooms without additional fixtures. The removable varieties perfect for renters or commitment-phobes who change their minds frequently. Create an accent ceiling by papering just the area above your bed or dining table. This unexpected design choice guarantees your ceiling becomes a conversation starter.
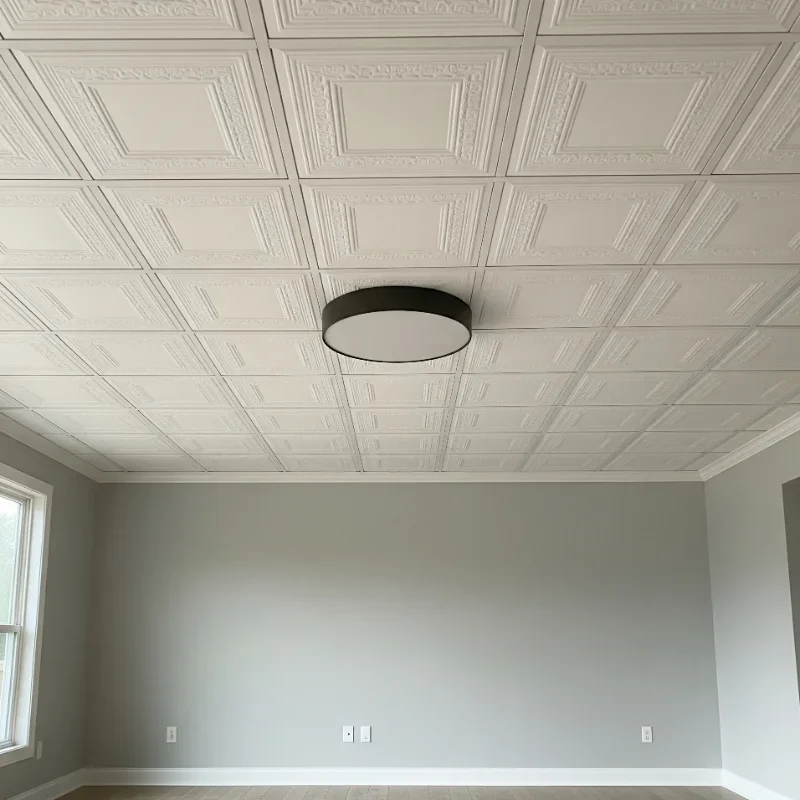
8. Install PVC Ceiling Tiles
Discover the secret weapon of budget renovators: PVC ceiling tiles that look expensive but cost peanuts! These waterproof wonders run about $1 to $3 per square foot and install with simple adhesive or double-sided tape. Available in designs mimicking everything from ornate plaster to sleek modern panels, they suit any aesthetic. The lightweight material cuts easily with scissors, making installation a breeze even for DIY newcomers. PVC tiles resist moisture, mold, and mildew, making them perfect for bathrooms, basements, and kitchens. They're also incredibly easy to clean with just soap and water. Layer different patterns for visual depth or stick to one design for cohesive elegance. Paint them any color to match your décor or leave them white for classic appeal. These tiles also provide slight insulation benefits while covering up unsightly popcorn texture or damaged drywall. Your ceiling transformation happens in hours, not days.
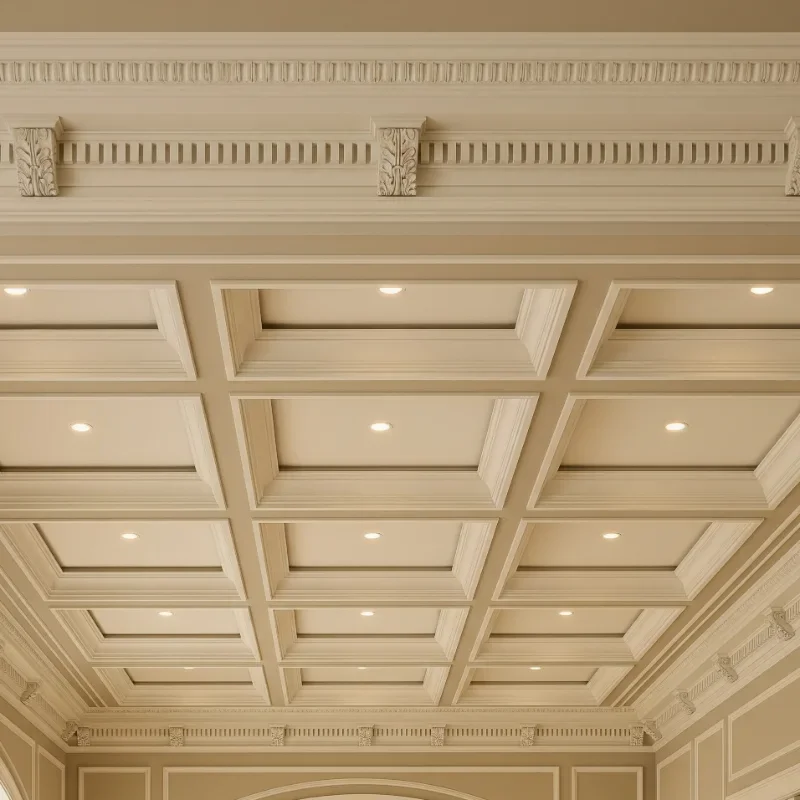
9. Create a Coffered Ceiling with Crown Molding
Achieve the luxury of coffered ceilings without the luxury price tag using strategic crown molding placement! Basic molding costs $2 to $8 per linear foot, and creating a grid pattern transforms flat ceilings into architectural masterpieces. Plan your grid on paper first, aiming for symmetrical rectangles or squares that complement your room's proportions. Cut molding pieces with a miter saw or have them cut at the hardware store. Attach with construction adhesive and finishing nails, then caulk seams for a seamless look. Paint everything one color for subtle elegance or use contrasting colors to emphasize the grid pattern. This technique works brilliantly in formal dining rooms, home offices, or master bedrooms where you want to add gravitas. The shadows created by the molding add depth and visual interest throughout the day. Even a simple border around the ceiling's perimeter elevates the entire room's appearance.
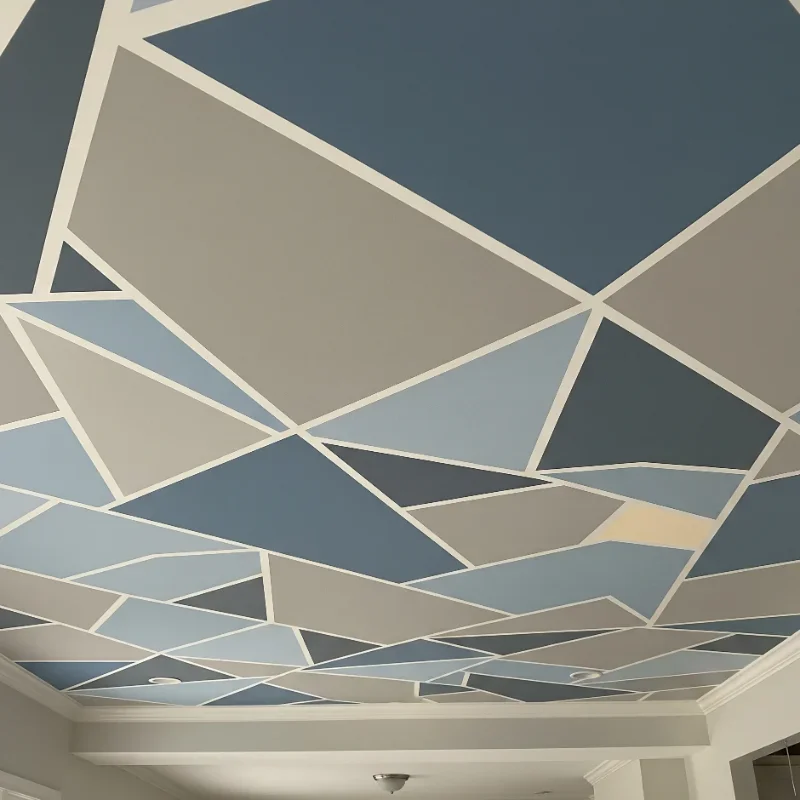
10. Paint Geometric Patterns and Designs
Unleash your inner artist with painted geometric patterns that cost nothing but paint and painter's tape! Create diamonds, hexagons, stripes, or chevron patterns using colors that complement your existing décor. Start by sketching your design on paper, then map it onto the ceiling using a measuring tape and chalk line. Precise taping takes time but ensures crisp, professional-looking lines that fool everyone into thinking you hired a muralist. Use sample paint pots for small accent designs, keeping costs under $20 total. Metallic paints add glamour to geometric designs, catching light beautifully throughout the day. Try an ombré effect with graduated shades of the same color for subtle sophistication. This technique works especially well in kids' rooms, creative spaces, or anywhere you want to inject personality. The best part? If you get tired of the design, it's just another coat of paint away from something new.
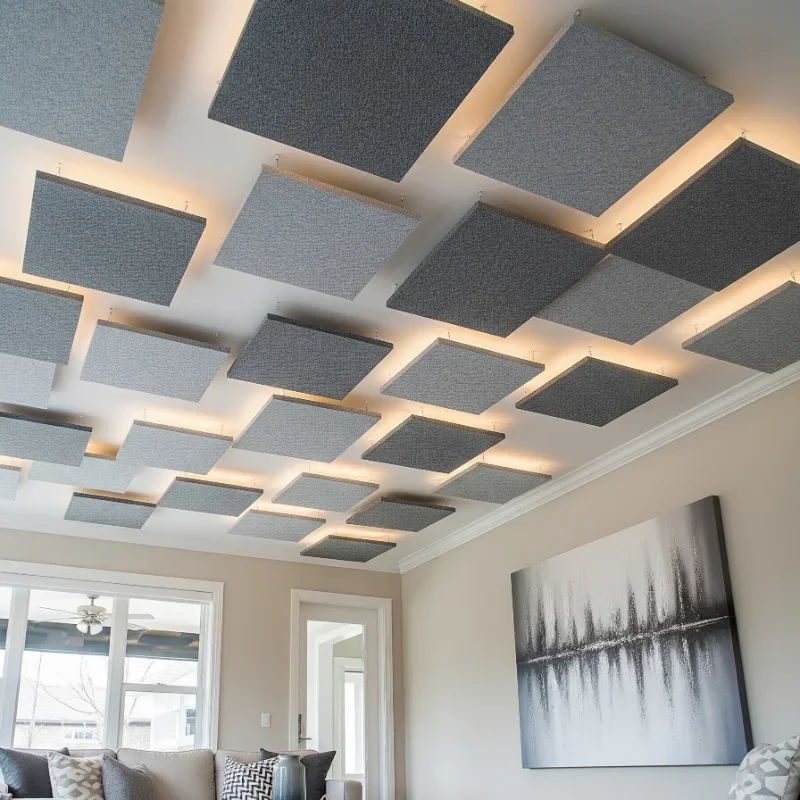
11. Hang Decorative Ceiling Panels
Modern decorative panels offer endless design possibilities without the permanence or cost of traditional renovations! These lightweight panels, made from materials like PVC, wood composite, or even cardboard, typically cost $10 to $30 per panel. Suspend them from your existing ceiling using wire, chains, or simple hook systems for a floating effect that adds dimension. Create patterns with different panel heights or arrange them randomly for an artistic installation. Backlight translucent panels with LED strips for ambient lighting that transforms your room's mood instantly. Mix materials and textures: combine wood-look panels with metallic ones for an eclectic vibe. This solution works perfectly for renters since panels remove easily without ceiling damage. They also hide unsightly fixtures, pipes, or ductwork in basements and lofts. Use them to define spaces in open floor plans, hanging panels above dining areas or workspaces for visual separation.
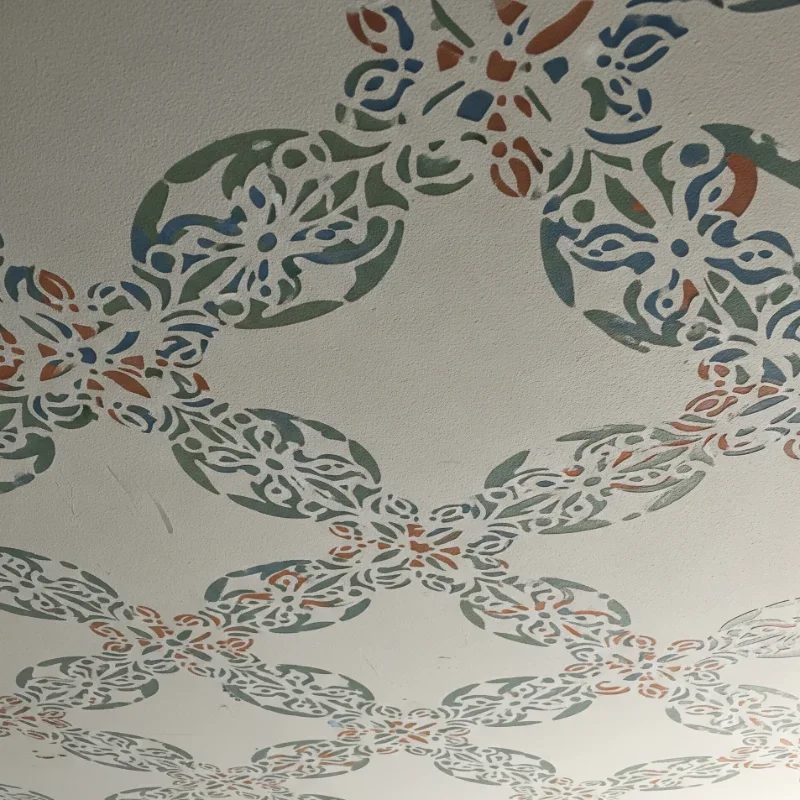
12. Apply Stenciled Designs
Turn your ceiling into a custom work of art using stencils that deliver hand-painted looks without artistic skills! Quality stencils cost $15 to $40 and create infinite design possibilities with just paint and patience. Choose from Moroccan patterns, delicate florals, bold graphics, or create custom stencils using cardboard. The key lies in using spray adhesive to keep stencils flat against the ceiling, preventing paint bleeding. Work systematically across your ceiling, using a foam roller or stippling brush for even coverage. Metallic paints make stenciled designs pop, while tone-on-tone creates subtle texture. Start with a small powder room or hallway to perfect your technique before tackling larger spaces. This method works beautifully for creating faux tile effects or border designs around ceiling edges. Mix different stencil patterns for an eclectic look or repeat one design for cohesive elegance. Your custom ceiling art costs less than a single piece of wall art.
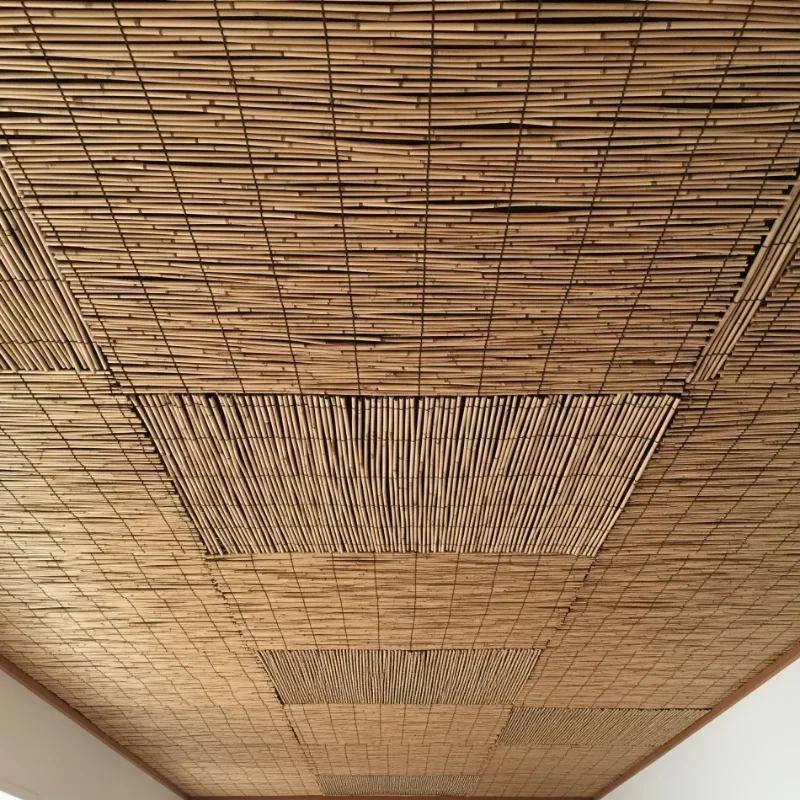
13. Install Bamboo or Reed Screening
Bring natural, tropical vibes indoors with bamboo or reed screening that transforms ceilings into organic artwork! These materials cost about $20 to $40 per roll and cover substantial areas quickly. Attach screening directly to your ceiling using staples or thin wooden strips as frames. The natural texture adds warmth while creating interesting shadow patterns as light filters through. This treatment works magnificently in sunrooms, covered patios, or any space where you want to blur indoor-outdoor boundaries. Layer screening at different heights for dimensional interest or use it to hide unsightly ceiling fixtures. The material's flexibility allows for curved installations that soften hard architectural lines. Spray paint screening for custom colors that match your décor while maintaining textural interest. These natural materials also provide some insulation and sound absorption benefits. Your room gains instant zen appeal that makes every day feel like a tropical vacation.
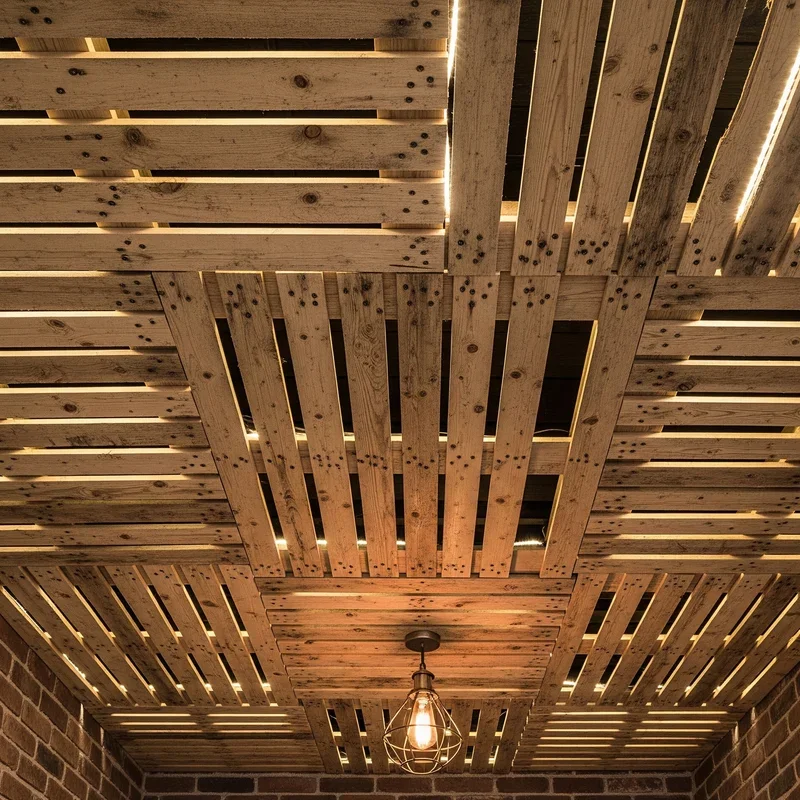
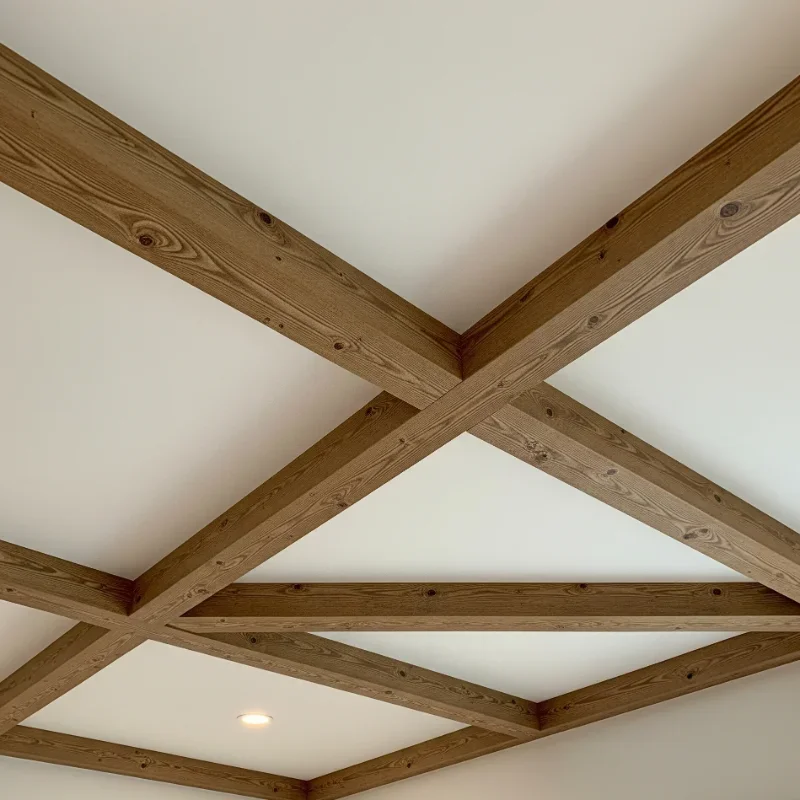
14. Create an Exposed Beam Look with Faux Wood
Get that coveted exposed beam look without the structural headaches or astronomical costs using lightweight faux beams! These polyurethane imposters cost $15 to $30 per linear foot versus hundreds for real wood beams. They come in various wood grains and finishes, fooling even seasoned contractors with their realistic appearance. Installation requires just construction adhesive and screws into ceiling joists, taking hours instead of days. Arrange beams parallel for traditional farmhouse charm or create grid patterns for more formal spaces. The hollow construction lets you hide unsightly wires or install lighting inside beams for dramatic uplighting. Paint or stain them to match existing woodwork or go bold with contrasting colors. These beams add architectural weight to large, empty ceilings while making spaces feel more intimate. Mix beam sizes for authentic variety or keep them uniform for contemporary clean lines.
15. Use Contact Paper for Quick Updates
Revolutionize your ceiling in under an hour using decorative contact paper that costs less than a pizza dinner! Modern contact papers come in stunning patterns from marble to wood grain, costing just $10 to $20 per roll. The self-adhesive backing means no messy glue or special tools, just peel and stick for instant transformation. This solution works perfectly for small spaces like closets, pantries, or bathroom ceilings where a little pattern goes a long way. Choose metallic finishes to reflect light and brighten dark corners or opt for bold patterns that become artistic focal points. The removable nature makes this ideal for renters or anyone who loves changing their décor frequently. Layer different papers for a patchwork effect or use one pattern for sophisticated simplicity. Contact paper also covers water stains, cracks, and other imperfections without repairs. Your ceiling makeover literally takes less time than assembling furniture!
Beyond just selecting paint or paneling that brightens the room, it’s also wise to think about air filtration systems when considering ceiling renovations. Proper air filtration can help reduce dust accumulation on ceiling surfaces, prevent mold formation in humid areas, and improve overall indoor air quality. Integrating a ceiling fan along with air filtration systems ensures that air circulates more effectively, keeping your space feeling fresh and clean. Especially in budget makeovers, a small investment in filtration can save on cleaning and maintenance in the long run.
Conclusion
Transforming your ceiling doesn't require deep pockets or professional contractors. These 15 budget-friendly ideas prove that creativity trumps cash when it comes to overhead makeovers. Whether you choose the simplicity of paint or the drama of faux beams, each option offers unique character at a fraction of traditional renovation costs. So grab your ladder, pick your favorite idea, and start looking up at new possibilities!
Read next: 15 Paper Craft Ideas for DIY Lovers
Frequently Asked Questions
Q1: Which ceiling makeover is the absolute cheapest?
Paint offers the most dramatic transformation for the least money, around $30-50 total.
Q2: Can renters use these ceiling ideas without losing their deposit?
Yes, try removable options like fabric, contact paper, or temporary adhesive products.
Q3: What's the easiest ceiling update for beginners?
Peel-and-stick wallpaper or contact paper requires no special tools or skills whatsoever.
Q4: How long do these DIY ceiling treatments typically last?
Most last 5-10 years with proper installation, though fabric and paper need occasional updates.
Q5: Which option best hides popcorn ceiling texture?
Foam tiles, wood planks, or beadboard panels effectively cover textured ceilings without removal.
Stay up to date with our latest ideas!