15 DIY Ceiling Ideas to Transform Any Room Easily
Discover 15 stunning DIY ceiling ideas to transform any room on a budget. From paint techniques to architectural details, create wow-worthy ceilings easily.

Ever looked up and thought your ceiling could use some love? You're not alone! Most homeowners forget about the "fifth wall" when decorating, but your ceiling holds incredible potential to transform your entire space. Whether you're working with a tiny budget or just love getting your hands dirty with DIY projects, these ceiling makeover ideas will turn that boring white expanse into a stunning focal point. From simple paint techniques that take just a weekend to more ambitious architectural additions, we've gathered 15 amazing ceiling transformations you can tackle yourself. Ready to stop ignoring what's overhead and start creating something spectacular?
1. Paint Your Ceiling a Bold Color
Who says ceilings have to be white? Painting your ceiling a bold color instantly transforms any room from ordinary to extraordinary. Dark colors like navy or charcoal create intimate, cozy spaces perfect for bedrooms or home theaters. Meanwhile, soft pastels can make small rooms feel larger and airier. The best part? This transformation only requires paint, rollers, and a weekend of your time. Consider how natural light hits your room throughout the day when choosing your color. A deep emerald ceiling in a sun-drenched living room creates stunning shadows and depth. Don't forget to use painter's tape for crisp edges where the ceiling meets the walls.

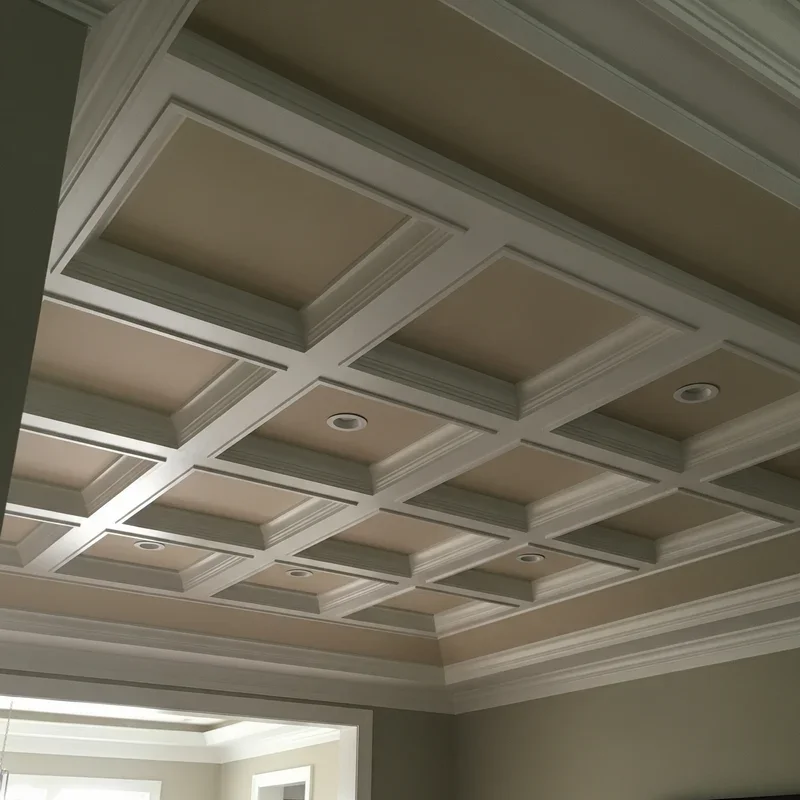
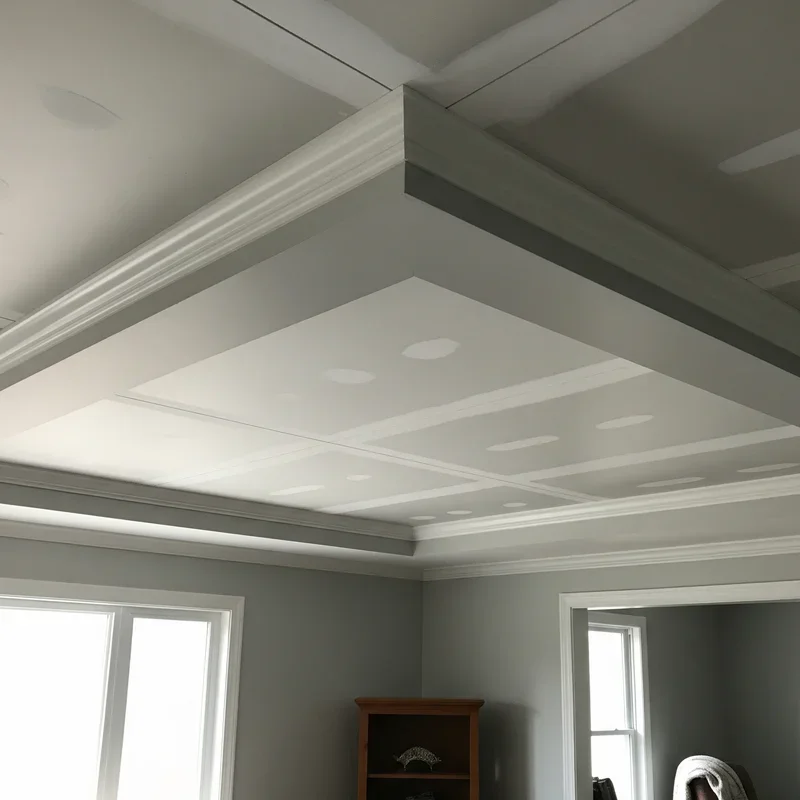
2. Create a Coffered Ceiling Effect
Want to add architectural interest without major construction? Creating a faux coffered ceiling gives your room instant elegance and dimension. Using lightweight foam molding or wood strips, you can design a grid pattern that mimics expensive traditional coffered ceilings. Start by planning your grid layout on paper, ensuring symmetrical spacing that complements your room's proportions. Attach the molding directly to your existing ceiling using construction adhesive and finishing nails. Paint everything the same color for a subtle effect, or use contrasting colors to make the coffers pop. This project typically takes a weekend and costs a fraction of real cofferred ceiling installation. Your guests will never guess it's not the real thing!
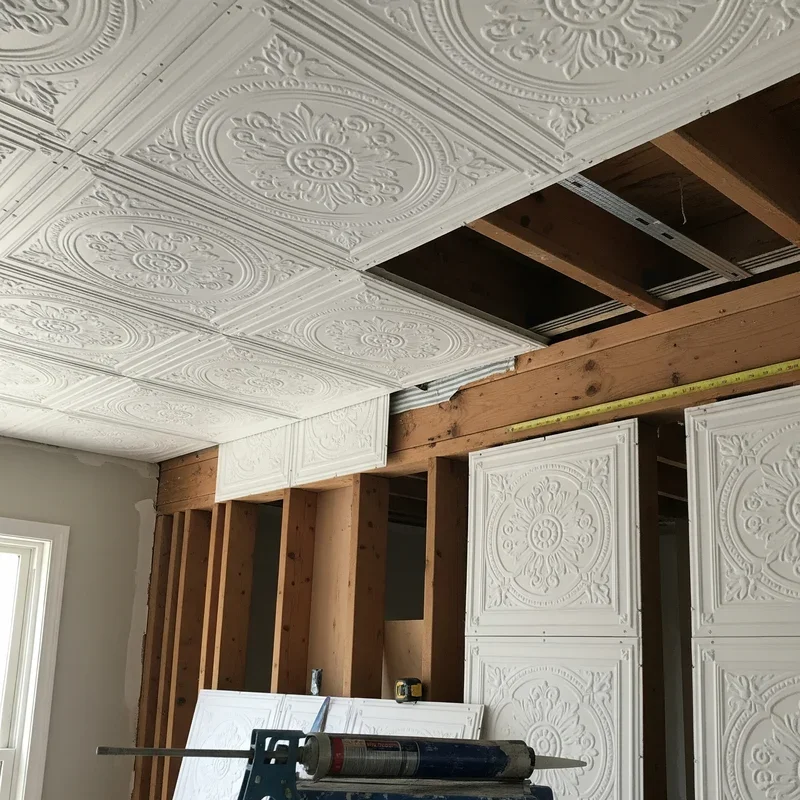
3. Install Decorative Ceiling Tiles
Remember those old drop ceilings everyone wanted to hide? Decorative ceiling tiles have come a long way! Today's options include stunning designs that range from vintage tin reproductions to modern geometric patterns. These lightweight tiles install easily over existing ceilings using adhesive or a simple grid system. Choose from materials like foam, PVC, or metal-look finishes that suit any style. For a cohesive look, continue the tile pattern down one accent wall. The tiles also help with sound absorption, making them perfect for home offices or media rooms. Most rooms can be completed in a single weekend, and damaged tiles swap out easily if needed.
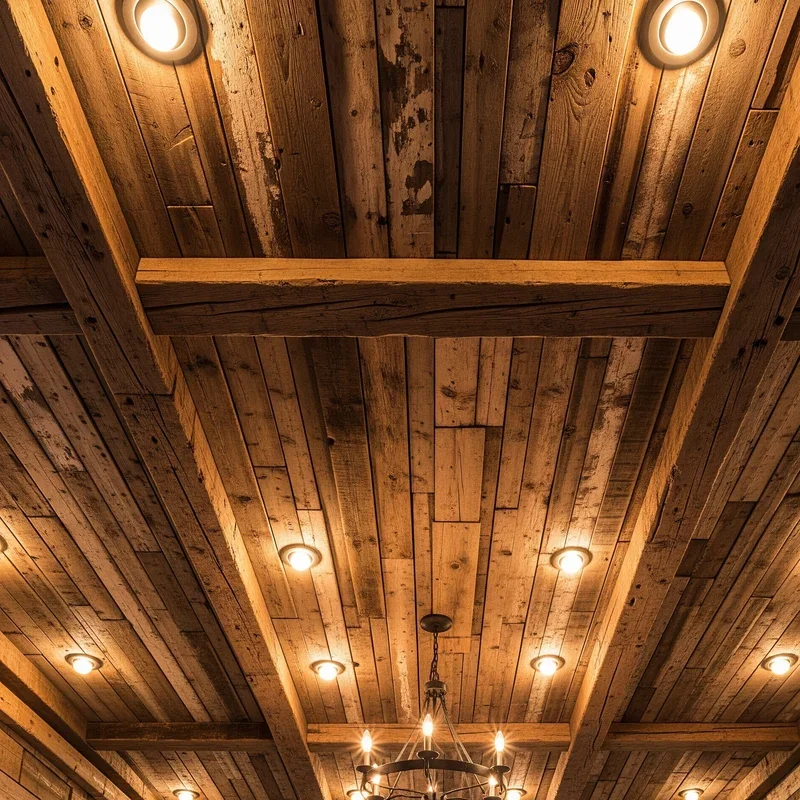
4. Add Wood Planks for Rustic Charm
Nothing says cozy quite like a wood-planked ceiling! This trendy treatment brings warmth and texture to any space, from farmhouse kitchens to modern bedrooms. You can use real wood planks, engineered wood, or even convincing wood-look vinyl for easier installation and maintenance. Start by determining your plank direction; running them perpendicular to ceiling joists provides the most support. Stain or paint the planks before installation to avoid neck strain later. Use a nail gun to secure planks directly to the ceiling, ensuring tight seams between boards. The natural variation in wood grain creates visual interest that painted ceilings can't match. This project transforms cold, sterile spaces into inviting retreats.
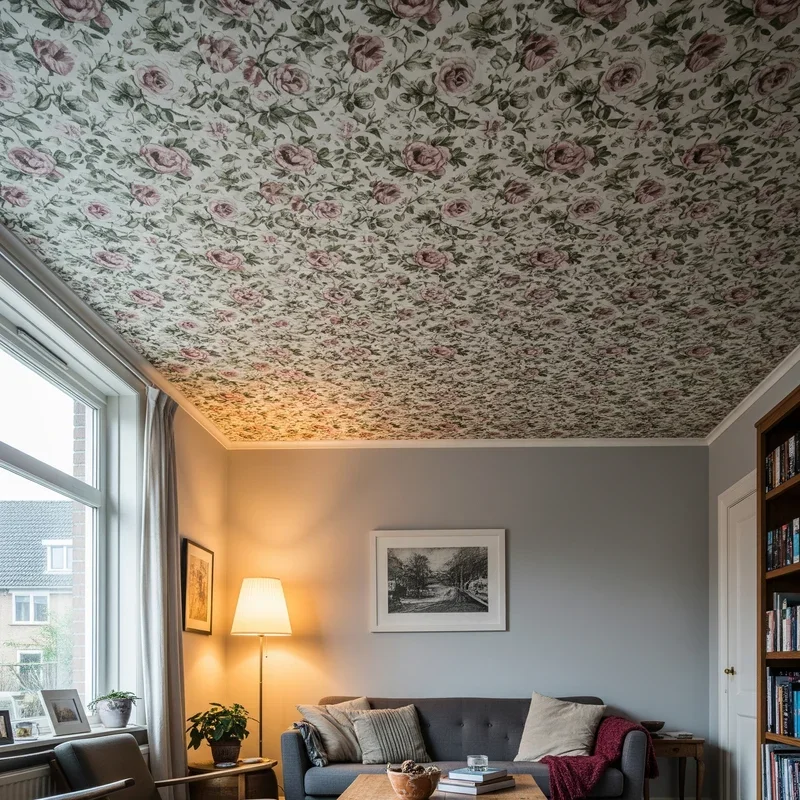
5. Apply Wallpaper to Your Ceiling
Think wallpaper belongs only on walls? Think again! Ceiling wallpaper creates unexpected drama and personality in any room. Choose from endless patterns like clouds for a nursery, botanical prints for a powder room, or geometric designs for modern spaces. The key to success lies in proper preparation and having a helper. Start with a smooth, clean ceiling and use high-quality wallpaper paste. Work in sections, smoothing out bubbles as you go. Removable wallpaper makes this perfect for renters or commitment-phobes. Consider using metallic or textured papers that catch and reflect light beautifully. This budget-friendly option delivers maximum impact with minimal investment.
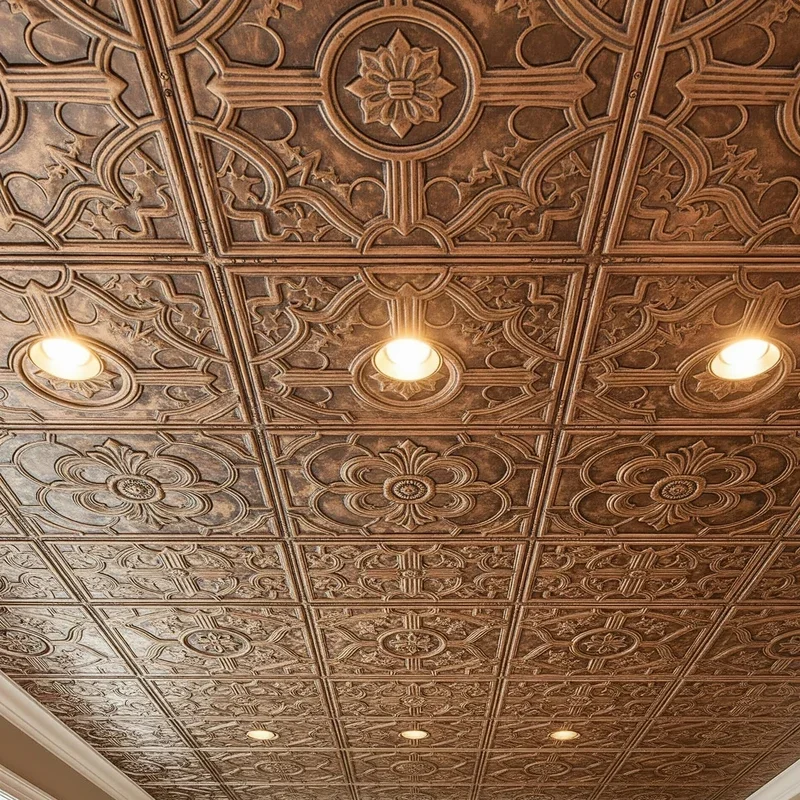
6. Create a Faux Tin Ceiling
Vintage tin ceilings scream old-world charm, but authentic versions cost a fortune. Enter faux tin tiles! These embossed panels capture all the decorative detail of traditional tin at a fraction of the price. Made from PVC, foam, or aluminum, they're lightweight enough for easy DIY installation. Choose from dozens of patterns, from simple geometric designs to ornate Victorian styles. Install them using construction adhesive, overlapping edges for seamless coverage. Paint them metallic silver, copper, or bronze for authenticity, or go bold with unexpected colors. They work especially well in kitchens, dining rooms, or anywhere you want to add vintage character without the vintage price tag.
7. Install Crown Molding
Crown molding bridges the gap between walls and ceiling, adding instant sophistication to any room. While traditional wood molding requires precise miter cuts, today's foam and polyurethane options make installation foolproof. Choose a profile that matches your home's style, from simple colonial to elaborate Victorian designs. Use a miter box for corner cuts, and don't stress about small gaps since caulk works miracles. Paint the molding before installation to save your neck, then touch up after. For extra drama, install uplighting behind the crown molding to create beautiful ambient lighting. This single addition makes ceilings appear higher and rooms feel more finished and luxurious.
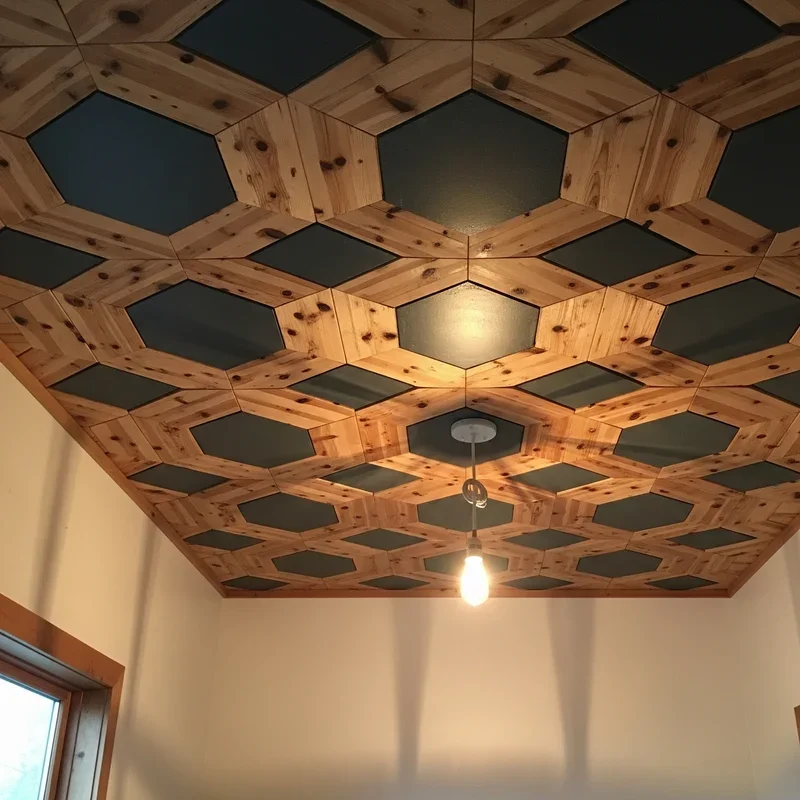
8. Design a Geometric Pattern
Transform your ceiling into a work of art with painted geometric patterns! This trendy technique requires only painter's tape, paint, and patience. Start by sketching your design on paper, considering your room's size and furniture placement. Popular patterns include hexagons, triangles, or intersecting lines that create dynamic visual interest. Use a laser level to ensure straight lines and consistent spacing. Apply tape carefully, pressing edges down firmly to prevent paint bleed. Choose colors that complement your decor, using either subtle tone-on-tone combinations or bold contrasting hues. Remove tape while paint is slightly wet for the crispest lines. This affordable project makes a massive impact in modern or eclectic spaces.
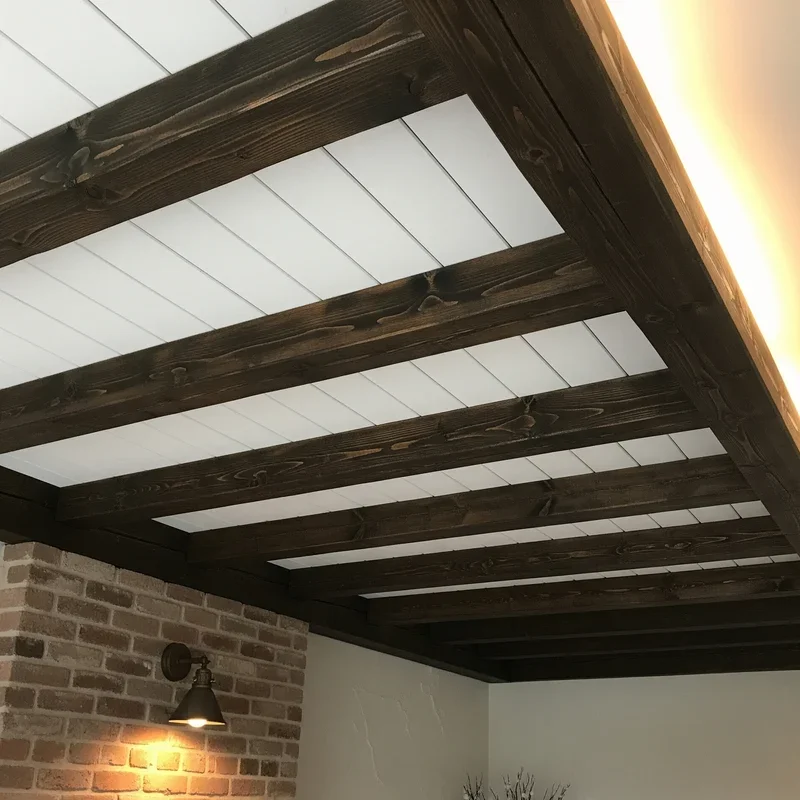
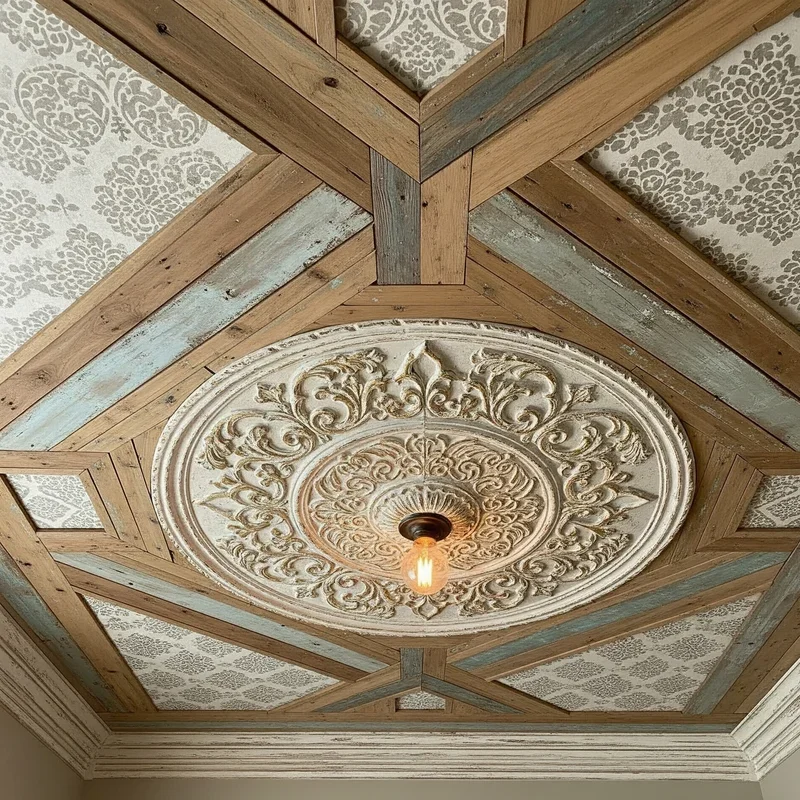
9. Add Exposed Beams
Exposed beams instantly add character and architectural interest to bland ceilings. While real wood beams require structural considerations, faux beams offer the same visual impact without the weight or expense. These hollow boxes come in various wood tones and textures, installing easily with mounting blocks and screws. Arrange beams parallel for a traditional look, or create a grid pattern for more drama. Stain or paint them to match your decor, from weathered gray for coastal vibes to rich walnut for traditional elegance. They work beautifully in vaulted ceilings, defining spaces in open floor plans. This weekend project delivers the charm of a century-old home in hours, not years.
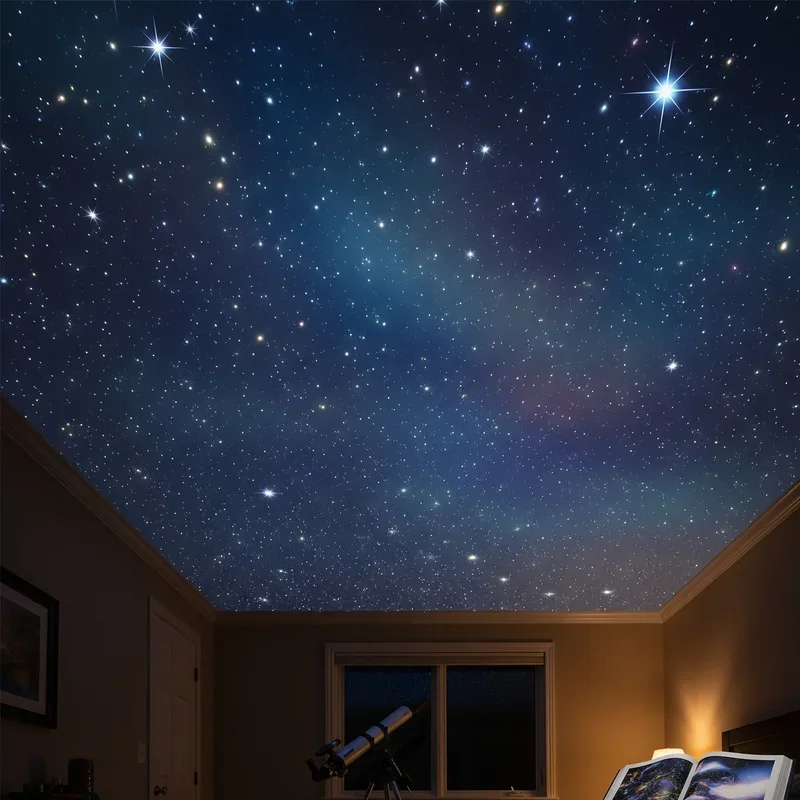
10. Create a Starry Night Sky
Bring the magic of the night sky indoors with a constellation ceiling! This whimsical idea works perfectly in bedrooms, nurseries, or meditation spaces. Start with a dark base coat in navy or black. Using glow-in-the-dark paint or fiber optic lights, create your favorite constellations or random star patterns. For ultimate realism, vary star sizes and brightness levels. Add the Milky Way with a sponge-painting technique using lighter blues and purples. Some DIYers incorporate LED strips behind crown molding for a subtle aurora effect. During the day, your ceiling looks sophisticated and moody. At night? Pure magic that makes bedtime an adventure for kids and adults alike.
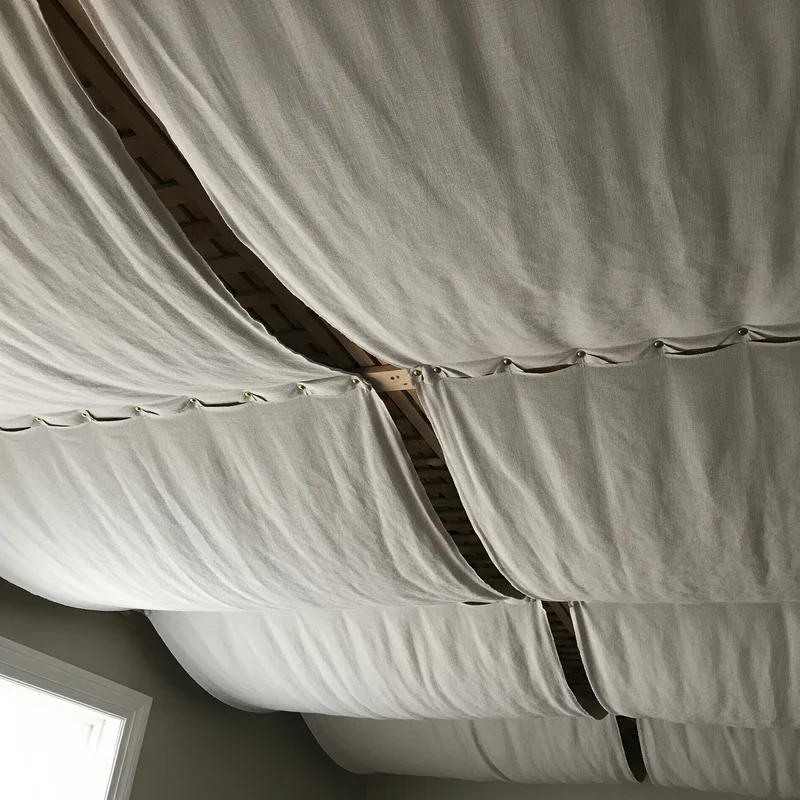
11. Install a Fabric Ceiling
Fabric ceilings offer softness and texture that paint simply can't achieve. This technique works especially well for hiding imperfect ceilings or adding sound dampening to noisy rooms. Choose lightweight fabrics that drape well, like muslin, canvas, or even decorative sheets. Create a framework using wooden strips around the ceiling perimeter, then stretch and staple your fabric taut. For added dimension, create billowy effects by allowing extra fabric between attachment points. Sheer fabrics paired with hidden LED lighting create ethereal, cloud-like effects. This temporary solution perfect for renters removes easily without ceiling damage. Plus, you can change fabrics seasonally for instant room updates.
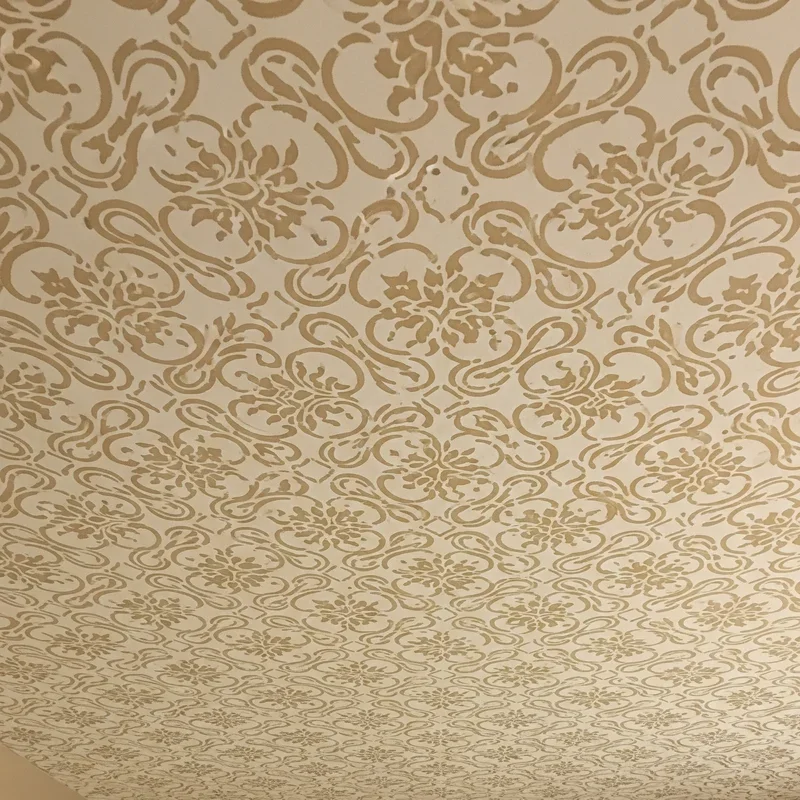
12. Use Stencils for Intricate Designs
Stenciling delivers professional-looking patterns without artistic skills or wallpaper commitment. From Moroccan tiles to delicate florals, stencil options are endless. Invest in quality mylar stencils that lay flat and resist paint seepage. Start from your ceiling's center, working outward for balanced design placement. Use a stippling brush or foam roller for even coverage, applying thin coats to prevent bleeding. Metallic paints add glamour, while tone-on-tone creates subtle elegance. For large ceilings, consider creating a central medallion design rather than covering the entire surface. This technique works beautifully with any decor style and updates easily when trends change. The result? Custom designer ceilings on a DIY budget.
13. Create a Medallion Focal Point
Ceiling medallions traditionally surrounded light fixtures, but modern versions make stunning standalone focal points. Choose from lightweight polyurethane options in sizes from petite to grand, with designs ranging from simple to ornate. Install your medallion using construction adhesive, centered on your ceiling or around existing fixtures. Paint it to match your ceiling for subtle elegance, or use contrasting colors to make it pop. Metallic finishes like gold or copper add glamour to formal spaces. For extra drama, install multiple smaller medallions in a pattern. This quick project instantly elevates any room's sophistication level, making builder-grade homes feel custom. Best part? Installation takes less than an hour!
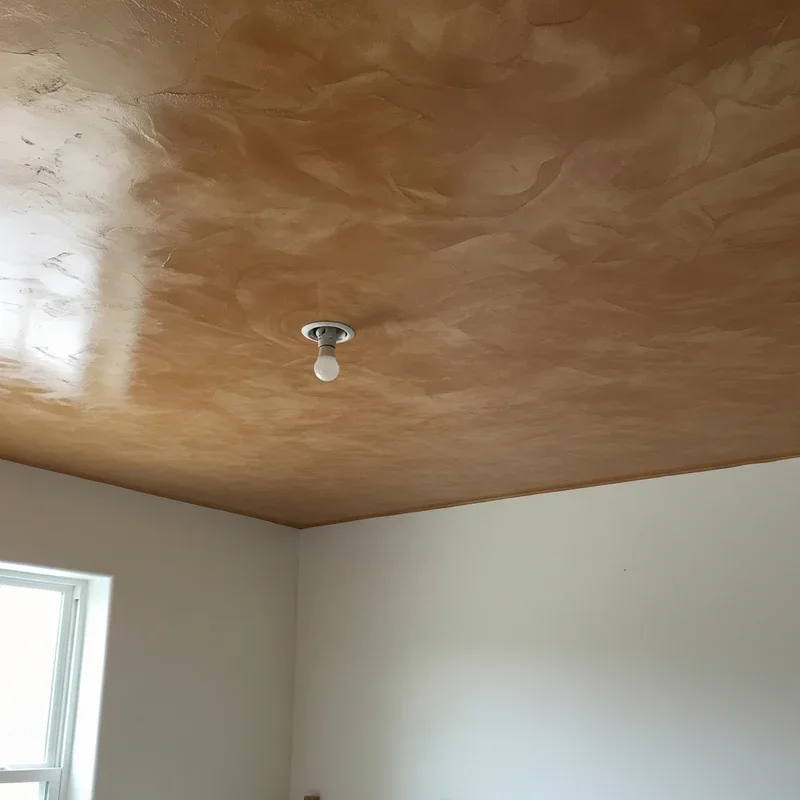
14. Apply Venetian Plaster
Venetian plaster creates old-world elegance with its subtle texture and depth. While traditional application requires skill, modern products make this technique accessible to DIYers. Choose from pre-mixed options that simplify the process without sacrificing the luxurious finish. Apply thin layers using a trowel or wide putty knife, creating subtle swirls and texture. Build up layers for more dimension, allowing each to dry completely. The final burnishing step creates the signature polished look that catches light beautifully. Tint your plaster for custom colors, or stick with classic ivory for timeless appeal. This treatment works especially well in dining rooms and master bedrooms where you want understated luxury.
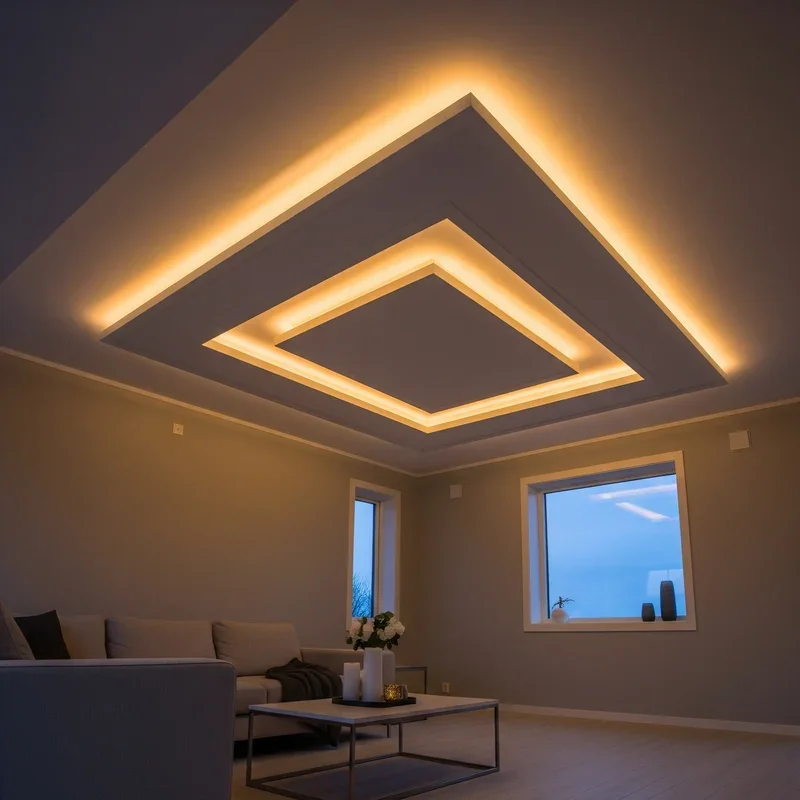
15. Install LED Strip Lighting
LED strips transform ceilings from static surfaces into dynamic light features. These versatile lights install easily along ceiling perimeters, creating ambient cove lighting that makes rooms feel larger and more luxurious. Choose from color-changing options controlled by smartphone apps or simple warm white for classic elegance. Hide strips behind crown molding or create recessed channels for seamless integration. For dramatic effect, install strips in geometric patterns directly on the ceiling. Smart LED strips sync with music or movies, turning your ceiling into an entertainment feature. Energy-efficient and long-lasting, they provide beautiful lighting without the heat or expense of traditional fixtures. This modern solution brings your ceiling into the 21st century.
Conclusion
Your ceiling doesn't have to be the forgotten surface anymore! These 15 DIY ideas prove that transforming your "fifth wall" is easier and more affordable than you might think. Whether you choose bold paint, architectural details, or innovative lighting, each project offers unique ways to express your style. Start small with a powder room or bedroom, then tackle larger spaces as your confidence grows. Remember, the best ceiling treatment is one that makes you smile every time you look up!
Read next: 15 DIY Christmas Decorations Ideas for Cozy Homes
Frequently Asked Questions
Q1: Which ceiling idea is most budget-friendly?
A1: Painting your ceiling costs under $50 for most rooms.
Q2: Can renters do these ceiling projects?
A2: Yes, try removable wallpaper, fabric ceilings, or lightweight stick-on tiles.
Q3: How long do most ceiling DIY projects take?
A3: Most projects complete in one weekend with proper planning beforehand.
Q4: Do I need special tools for ceiling work?
A4: Basic tools suffice; consider renting specialized equipment when needed occasionally.
Q5: Which ceiling treatment hides imperfections best?
A5: Textured treatments like Venetian plaster or fabric installations conceal flaws effectively.
Stay up to date with our latest ideas!