15 DIY Small Craft Room Ideas for Organized Style
Transform cramped corners into creative havens with 15 DIY small craft room ideas featuring smart storage and stylish organization solutions.

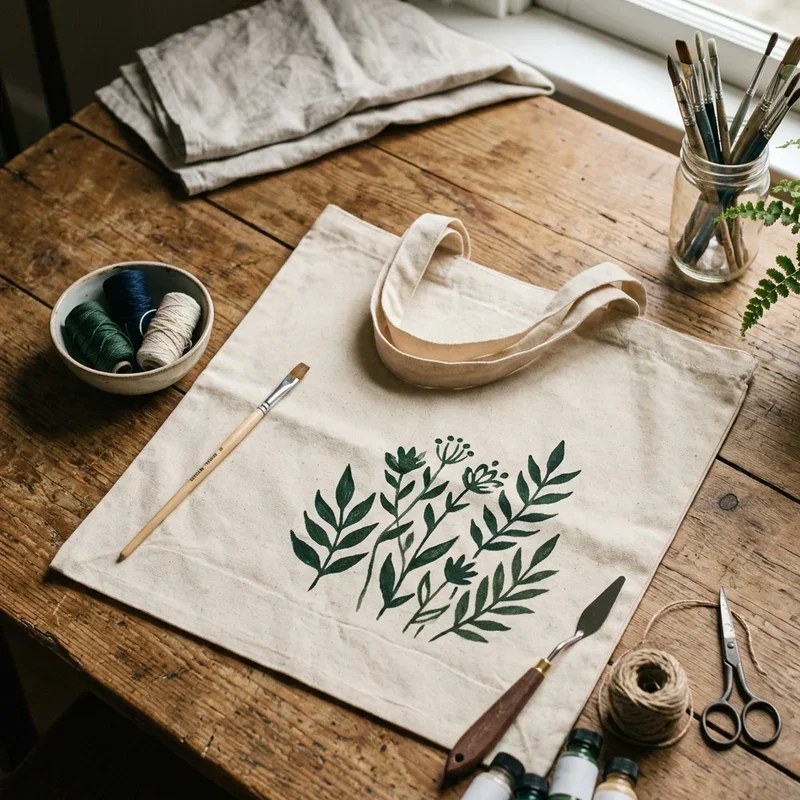
Ever felt like your craft supplies are staging a rebellion against your living space? You're not alone! Every crafter knows the struggle: yards of fabric here, scattered beads there, and don't even get me started on the glitter explosion from last Tuesday. But what if I told you that your tiny spare closet, that awkward corner, or even that forgotten wall could become a crafting paradise? Size doesn't matter when it comes to creativity (take that, mansion-owning crafters!). Whether you're a weekend warrior with watercolors or a serious sewer with more thread than a textile factory, these DIY solutions will transform your small space into an organized oasis. Think of it as Marie Kondo meets Bob Ross, where everything has its place and every place sparks joy. Ready to turn that chaotic craft corner into a Pinterest-worthy workspace that actually works? Let's get those creative juices flowing and those supplies sorted!
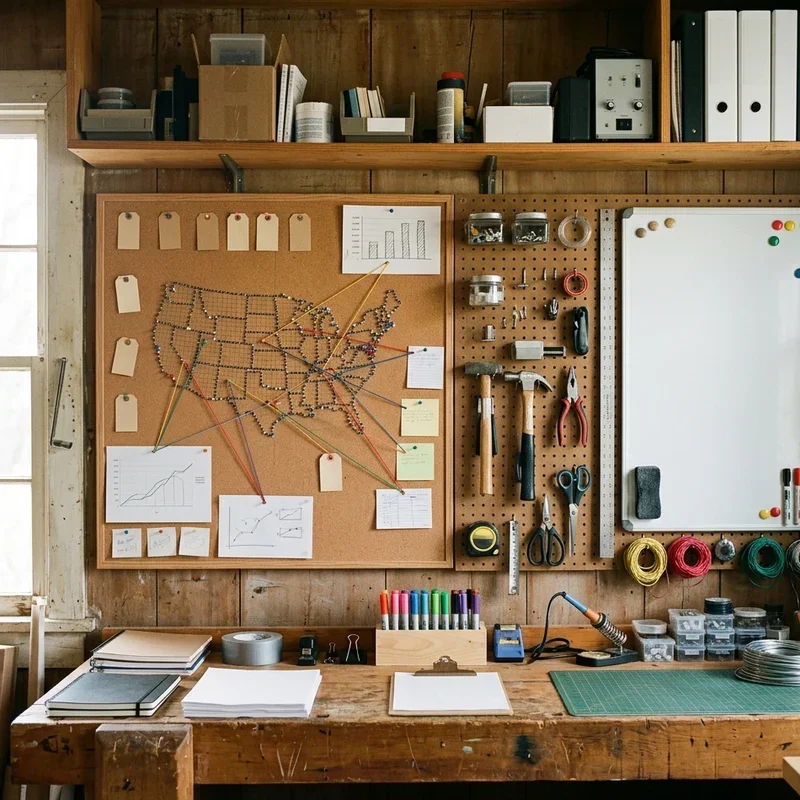
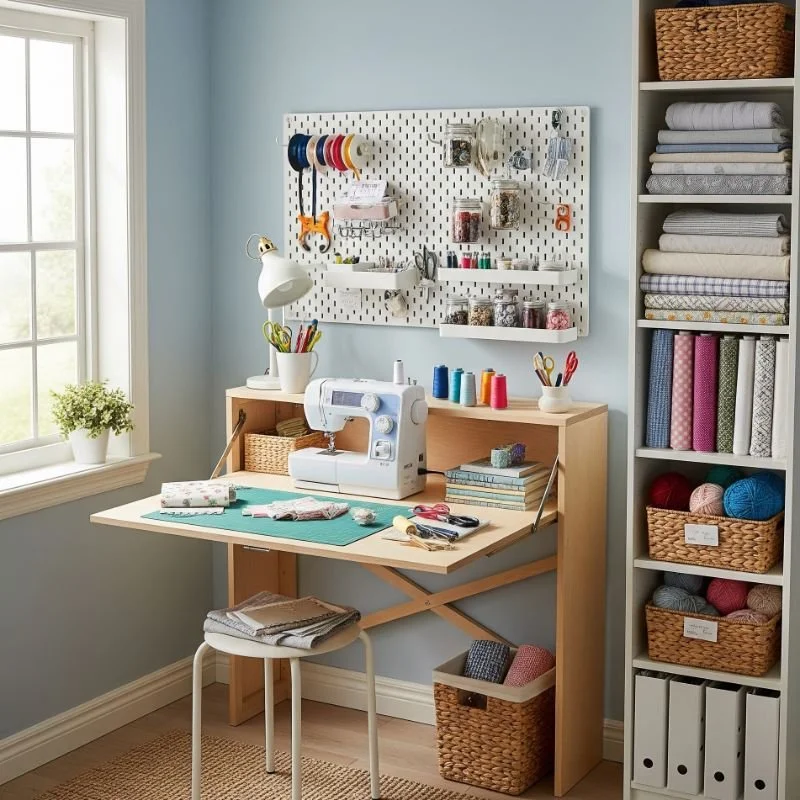
1. Pegboard Wall Wonder
Transform any blank wall into a customizable storage powerhouse with a DIY pegboard system that grows with your crafting needs. Paint it in your favorite color to match your room's aesthetic while creating zones for different supplies using colored sections. The beauty lies in its flexibility: rearrange hooks, baskets, and shelves as your projects evolve without committing to permanent fixtures. Install small containers for buttons and beads, hang scissors from hooks, and display inspiring fabric swatches all in one organized display. The vertical storage maximizes every inch of wall space while keeping supplies visible and accessible. Add LED strip lights around the edges for a professional craft studio vibe that illuminates your workspace. This budget-friendly solution costs less than traditional shelving but offers infinitely more versatility for changing craft interests.

2. Fold-Down Craft Desk
Create a disappearing workspace with a wall-mounted fold-down desk that transforms from flat wall art to functional craft station in seconds. Build it yourself using a sturdy wooden board, heavy-duty hinges, and supportive chains or brackets that hold substantial weight. When closed, the desk front can display a decorative panel, chalkboard for project planning, or corkboard for inspiration. Inside, install small shelves and compartments to store frequently used supplies that won't fall when the desk closes. This space-saving miracle works perfectly in studio apartments, shared bedrooms, or any room doing double duty. Position it near a window for natural light or add a swing-arm lamp that folds flat against the wall. The magic happens when you realize your craft room literally disappears when guests arrive.
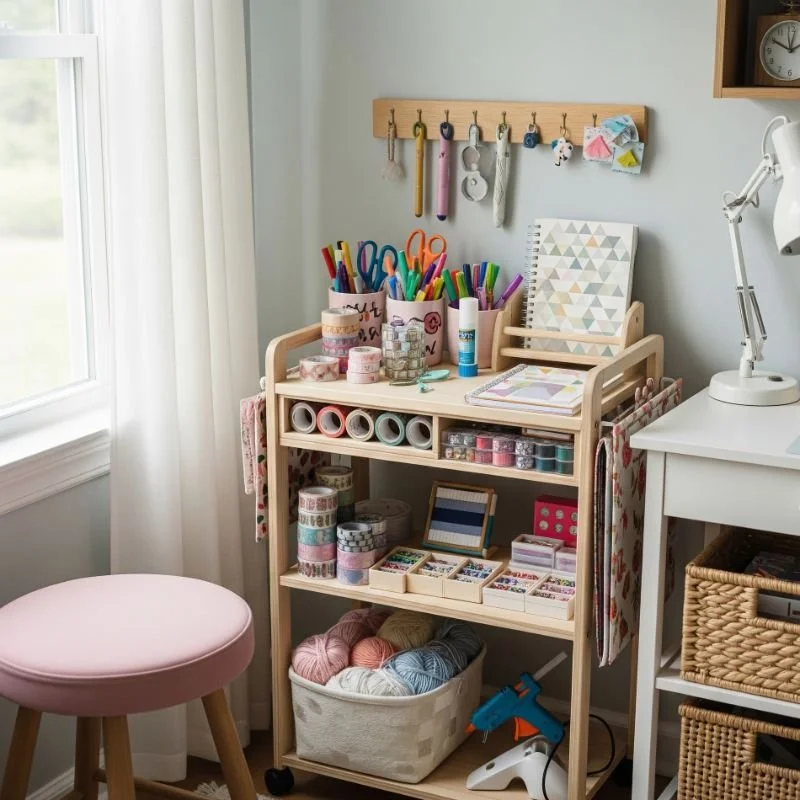
3. Rolling Cart Command Center
Mobilize your creativity with a DIY rolling cart that serves as a portable craft headquarters moving wherever inspiration strikes. Start with an inexpensive utility cart and customize each tier for specific supplies: top for current projects, middle for tools, bottom for bulk storage. Add hanging buckets on the sides for scissors and rulers, magnetic strips for metal tools, and a pegboard backing for vertical storage. The wheels mean you can roll it into a closet when not in use or bring it to the kitchen table for better lighting. Customize with contact paper or paint to match your decor, turning a utilitarian cart into a stylish studio assistant. Include a small cutting mat on top to create an instant work surface wherever you park it.
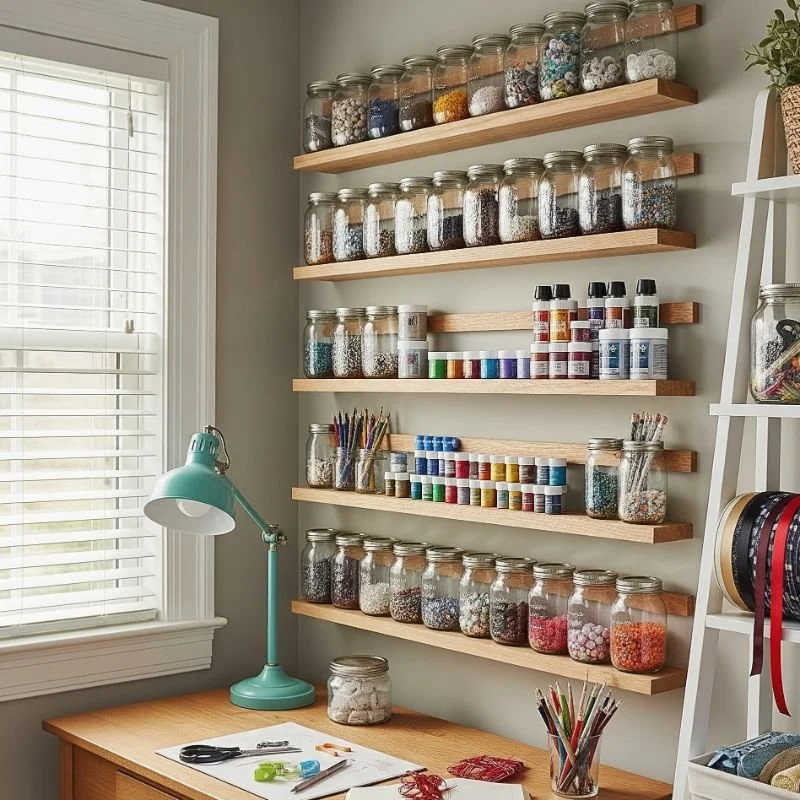
4. Mason Jar Wall Storage
Harness the charm and functionality of mason jars by creating a wall-mounted storage system that's both practical and Instagram-worthy. Attach hose clamps or special mason jar hangers to a wooden board, then mount it on your wall for instant see-through storage. Fill jars with paintbrushes, pencils, markers, or small notions like buttons and ribbons that benefit from visible organization. The transparent containers make finding supplies effortless while adding rustic farmhouse appeal to your craft space. Create different sized jar combinations for various supplies, using baby food jars for tiny items and quart jars for larger tools. Label the lids with chalkboard paint or pretty tags for extra organization points. This system costs pennies compared to store-bought organizers but delivers maximum style and function.
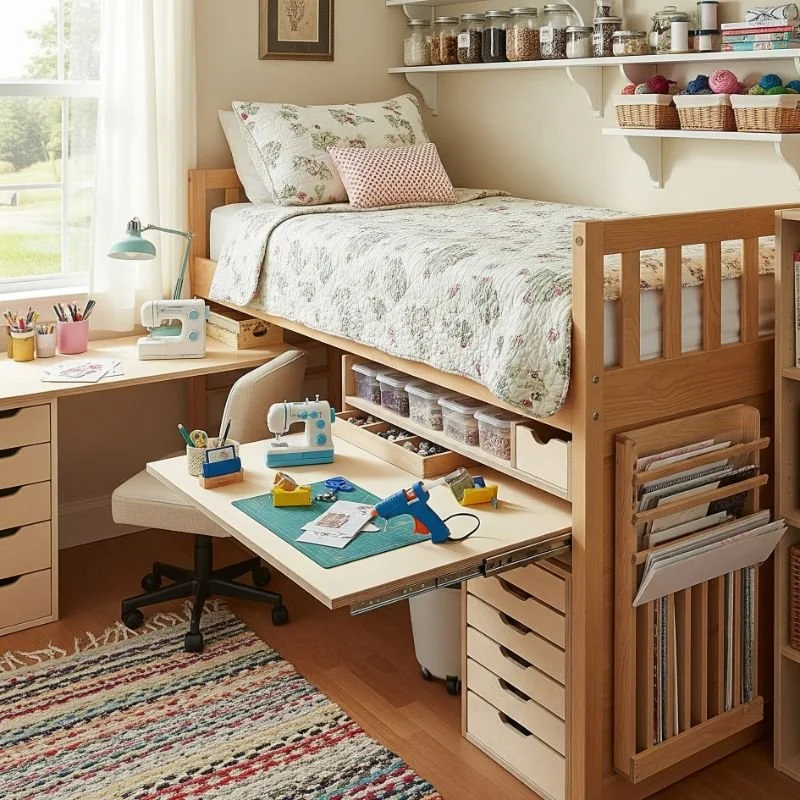
5. Under-Bed Craft Station
Unlock the hidden potential beneath your bed by creating a sliding craft station that maximizes often-wasted space. Build shallow wooden drawers on casters that slide out smoothly, dividing them into compartments for different supply categories. Use clear plastic boxes within the drawers for easy identification of contents without pulling everything out. This solution works especially well for flat items like paper, fabric, cutting mats, and pattern storage. Add battery-powered LED lights inside each drawer for visibility in the shadowy under-bed realm. The beauty of this system is that it keeps crafts completely out of sight while maintaining easy access when creativity calls. Include a inventory list taped inside each drawer to track supplies and prevent duplicate purchases.
6. Closet Craft Conversion
Transform an underutilized closet into a compact craft studio by removing doors and installing custom organization solutions. Add a small desk or table at comfortable height, utilizing the back wall for pegboard or shelving systems. Install tension rods for hanging fabric, ribbon spools, or project bags currently in progress. The existing closet rod becomes perfect for storing rolls of paper or vinyl using pants hangers. Use over-door organizers on any remaining doors for additional tool storage without sacrificing floor space. The contained nature means you can close doors (if kept) to hide works in progress instantly. This conversion particularly suits renters since most modifications are removable and won't damage the original closet structure.

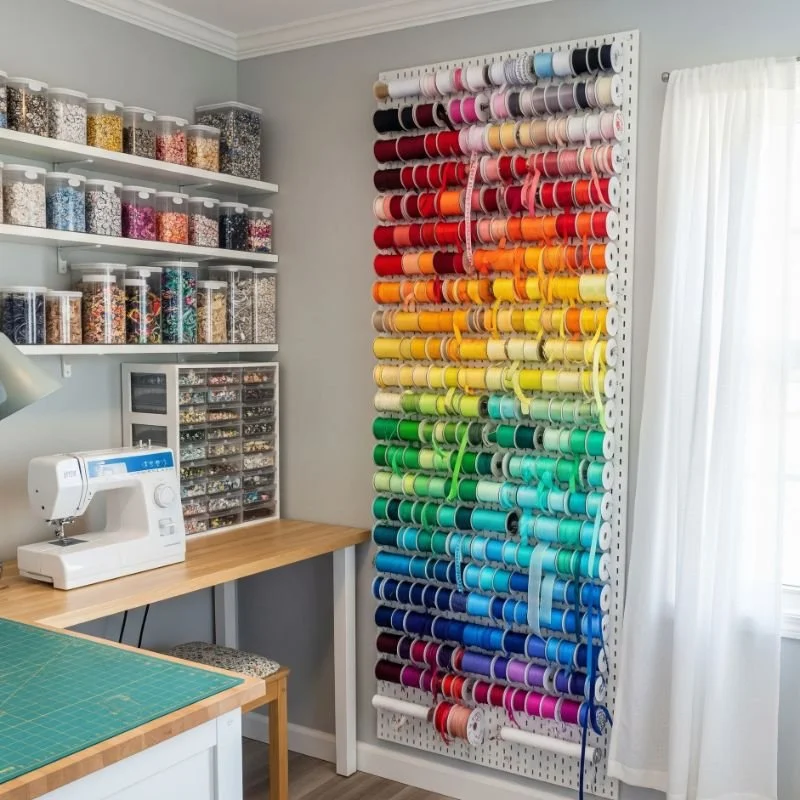
7. Vertical Ribbon Organizer
Conquer the ribbon chaos with a DIY vertical organizer that displays your collection like a rainbow of possibilities. Create a wooden frame with dowels running horizontally, spacing them to accommodate various ribbon spool sizes perfectly. Mount it on the wall or inside a cabinet door, threading ribbons through with ends hanging down for easy cutting access. This system prevents tangling while showcasing your colors and patterns for quick selection during projects. Add a small ruler along the bottom edge for measuring ribbon lengths without removing spools. For narrow ribbons, use curtain rods with cafe clips to hang individual spools in graduated lengths. This visual storage method transforms functional supplies into decorative wall art that inspires creativity.
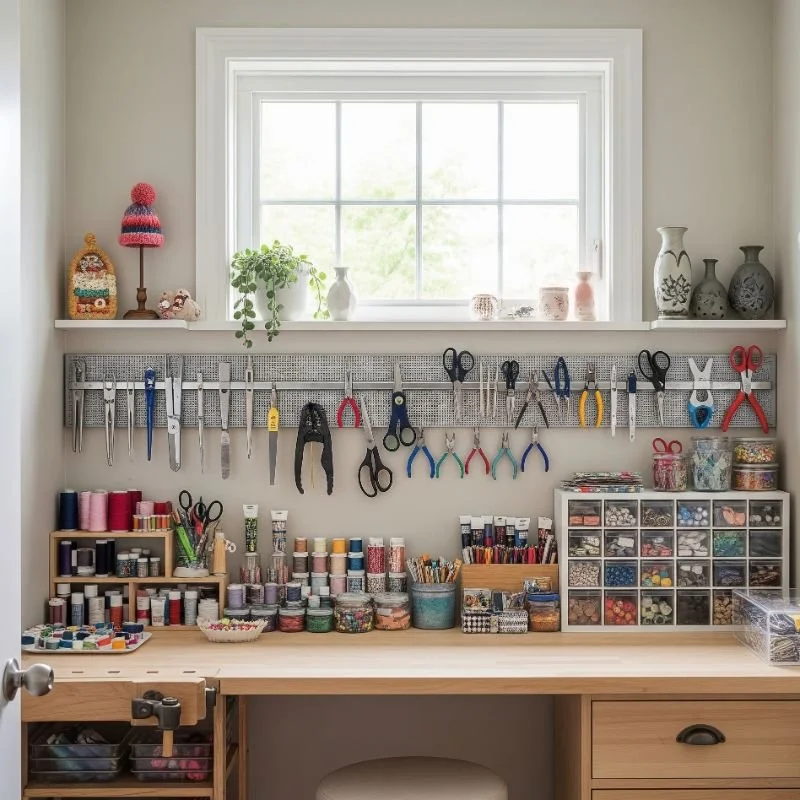
8. Magnetic Strip Tool Holders
Install magnetic knife strips strategically around your craft space to create instant homes for metal tools and supplies. These powerful strips hold scissors, rotary cutters, rulers, and even small metal containers filled with pins or needles. Paint the strips to match your decor or cover with decorative paper for a custom look that blends seamlessly. Position strips under shelves, along desk edges, or on walls within arm's reach of your primary workspace. The vertical storage keeps sharp tools safely off surfaces while maintaining easy access during projects. For non-magnetic items, attach small metal washers or plates to create magnetic compatibility. This solution costs less than traditional tool holders while providing superior visibility and accessibility.
9. Ceiling-Mounted Storage
Look up to discover untapped storage potential by installing ceiling-mounted systems that keep supplies accessible yet out of the way. Hang a ceiling-mounted pot rack to store baskets filled with yarn, fabric, or current projects within easy reach. Install a pulley system for bins that lower when needed and rise to ceiling height when not in use. Ceiling hooks work perfectly for hanging organizers, macrame supply bags, or even a suspended pegboard that doesn't eat wall space. This overhead approach particularly benefits rooms with limited wall space or those serving multiple purposes. Ensure proper installation into ceiling joists for safety with heavier items. The unexpected storage location adds visual interest while maximizing every cubic inch of room space.

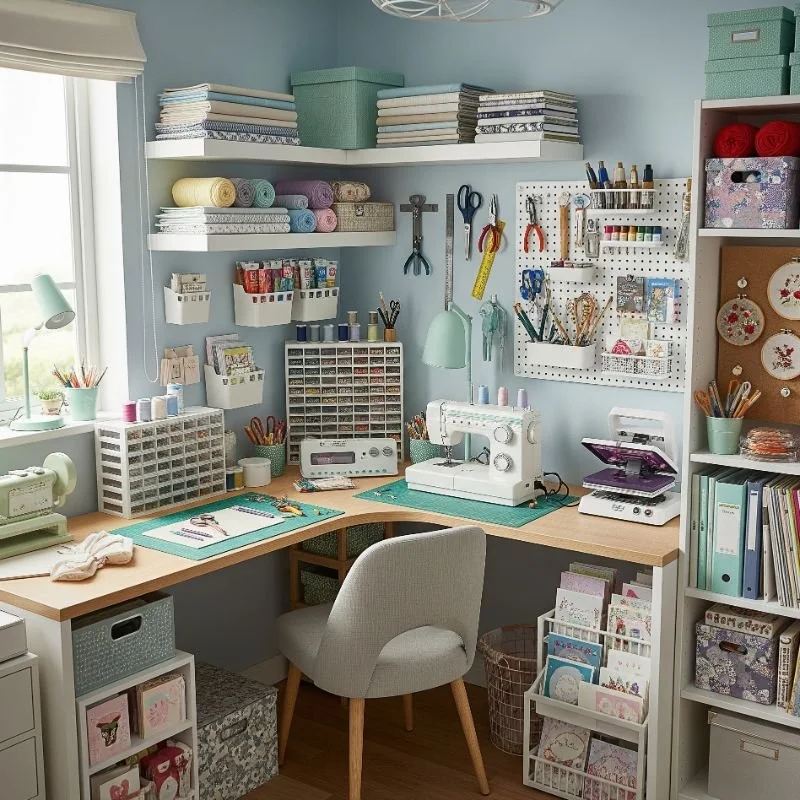
10. Corner Craft Nook
Transform dead corner space into a productive craft zone with custom-fit solutions that maximize awkward angles. Install floating corner shelves at varying heights to create vertical storage without overwhelming the small footprint. Add a triangular or curved desk that fits snugly into the corner, providing surprising amounts of workspace. Use lazy Susan turntables on shelves to access supplies stored in back corners easily. The confined space actually helps contain craft chaos while creating a cozy creative retreat. Install good task lighting since corners often lack natural illumination, perhaps with wall-mounted adjustable lamps. This corner command center proves that productive craft spaces don't require entire rooms, just smart use of available niches.
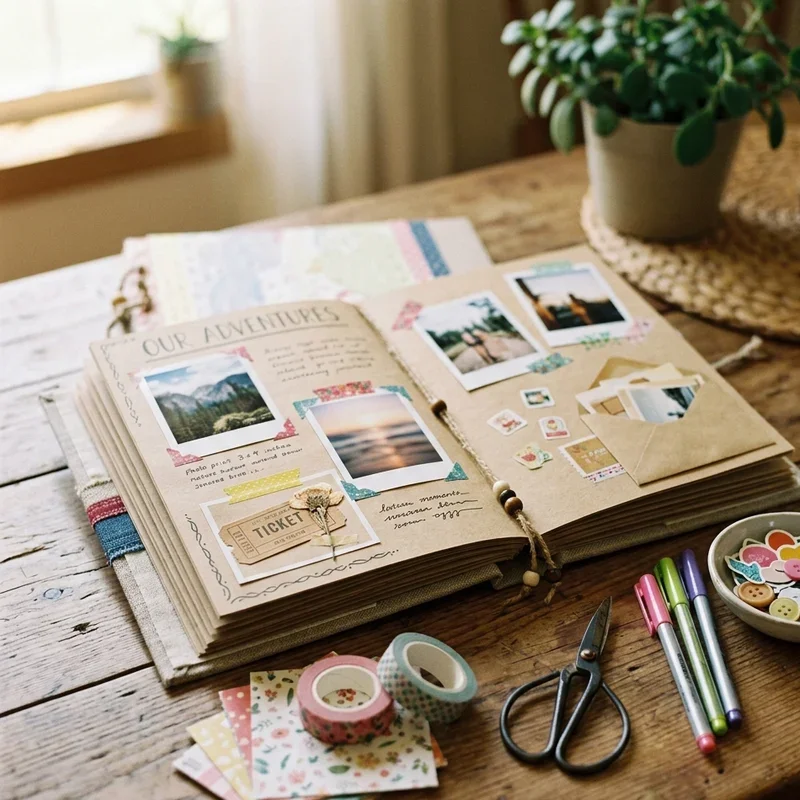
One great way to personalize your craft room is by displaying your favorite memories in a printed photo book. Instead of piling loose prints or posters, a high-quality printed photo book keeps images beautifully organized, easy to flip through, and protected from dust. You can place it on a shelf, coffee table, or even prop it on a stand for guests to browse. This adds a personal, decorative touch to your creative space while preserving your cherished moments.
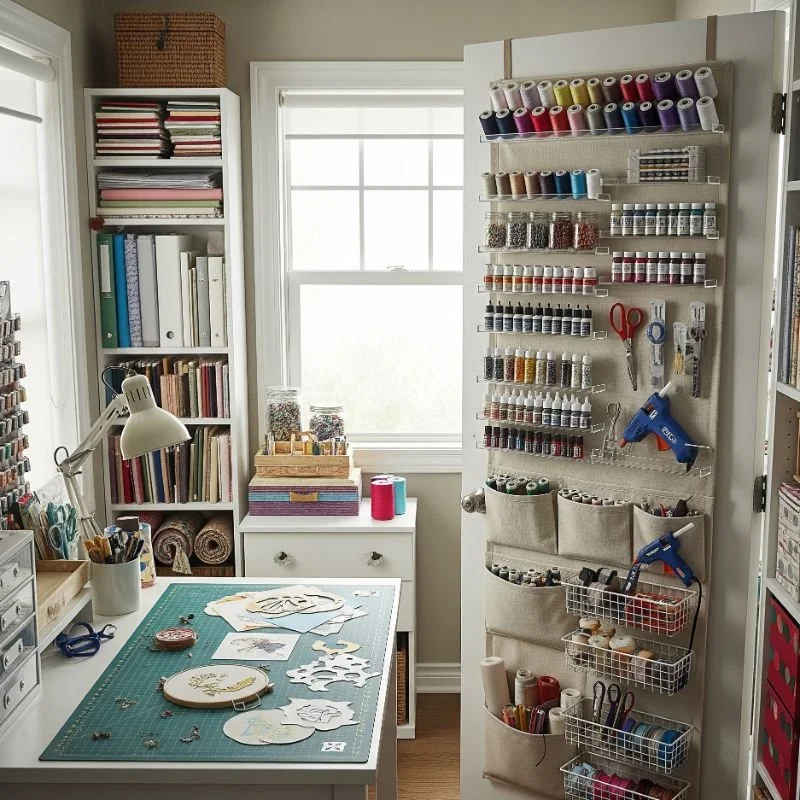
11. Behind-Door Organization
Utilize every door in your craft space as a vertical storage opportunity with over-door organizers and custom solutions. Install a full-length shoe organizer for storing small supplies like glue sticks, stamps, and embellishments in clear pockets. Mount corkboards or fabric-covered panels on door backs for displaying inspiration images or hanging lightweight tools. Create a custom organizer using wooden slats and small buckets for paintbrushes, markers, and scissors. The hidden storage maintains room aesthetics while providing substantial organization capacity. Use command hooks to hang cutting mats, rulers, or stencils flat against the door. This often-overlooked space can hold surprising amounts of supplies without cluttering visible room areas.
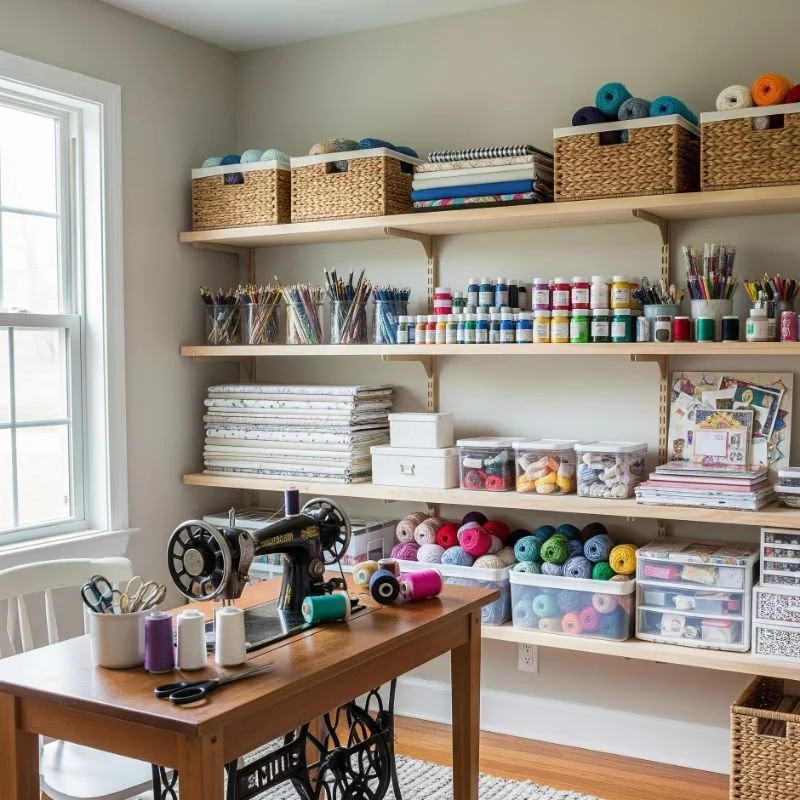
12. Floating Shelf Systems
Design a customized floating shelf system that adapts to your changing craft needs while maintaining clean, modern aesthetics. Stagger shelves at different heights and depths to accommodate various supply sizes and create visual interest. Use shelf brackets that allow for easy height adjustments as your storage needs evolve. Incorporate LED strip lighting underneath shelves to illuminate supplies and create ambiance in your craft space. Mix open shelving with boxes or baskets for items needing dust protection or visual concealment. The wall-mounted design keeps floor space clear while providing substantial storage capacity. Paint shelves in coordinating colors or wood stains that complement your room's decor for seamless integration.
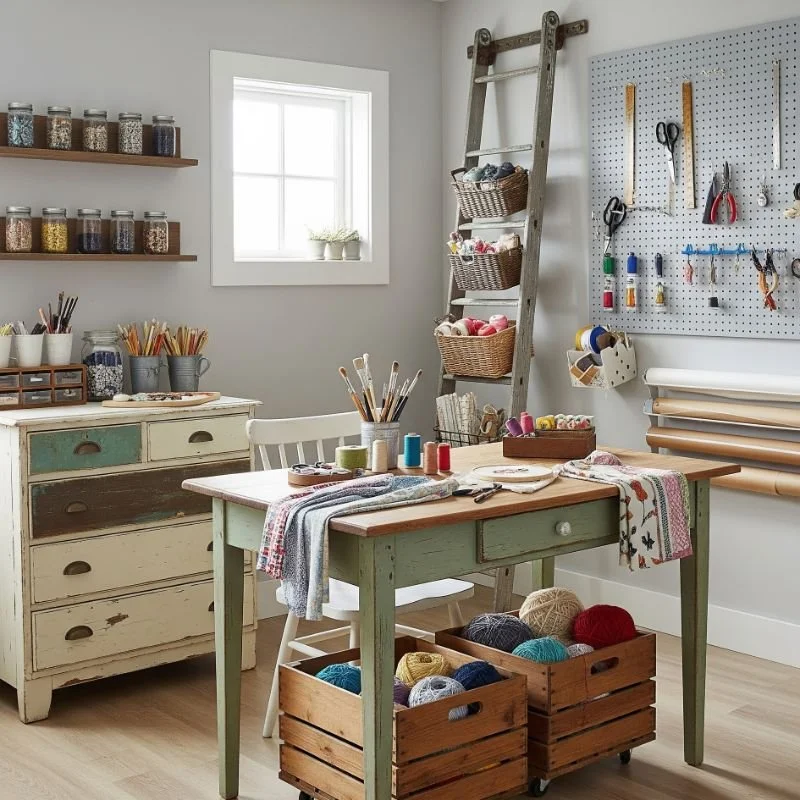
13. Repurposed Furniture Solutions
Give old furniture new life as craft storage by reimagining pieces for creative purposes. Transform an old dresser into a supply station by adding dividers to drawers and using the top for workspace. Convert a vintage suitcase into a portable craft kit with elastic straps and pockets for organization. Repurpose a ladder as a leaning storage unit for hanging baskets, fabric, or project bags. An old spice rack becomes perfect for storing small bottles of paint, glitter, or embellishments. This sustainable approach saves money while adding character that store-bought organizers lack. Scout thrift stores and garage sales for pieces with good bones that need only creative vision to become craft room stars.
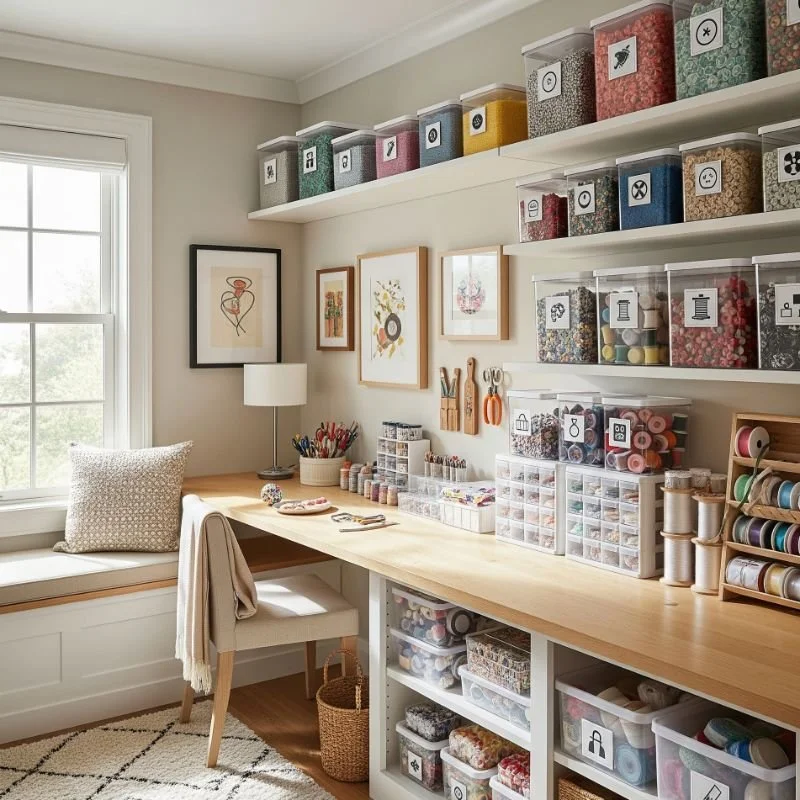
14. Clear Container Labeling System
Implement a comprehensive clear container system with consistent labeling that makes finding supplies instant and restocking obvious. Use uniform containers in various sizes, all transparent for easy identification of contents at a glance. Create a labeling system using a label maker or consistent handwriting, including both contents and quantity when relevant. Organize containers by category on shelves, with most-used items at eye level for convenience. The uniformity creates a clean, professional look while the transparency maintains functionality. Include photo labels for young crafters or visual learners who benefit from picture identification. This system scales beautifully as your craft collection grows, simply adding more labeled containers as needed.
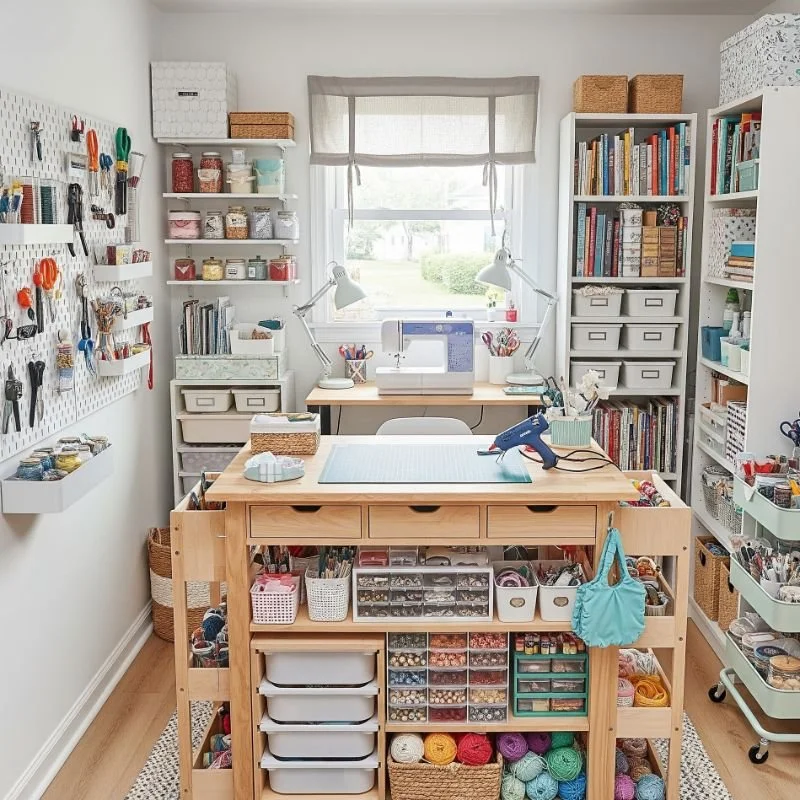
15. Multi-Purpose Craft Island
Build a mobile craft island that serves as workspace, storage unit, and room divider all in one compact design. Use a kitchen cart or bookshelf as the base, adding a larger top surface for expanded workspace. Install hooks on sides for hanging tools, add baskets underneath for storage, and include a power strip for plugging in tools. The island's mobility means it can move to wherever you need extra surface or storage. In small spaces, it can double as a console table or bar when not crafting. Choose a height that works for both sitting and standing tasks, adding adjustable stools for comfort. This versatile piece becomes the heart of your craft space while maintaining flexibility for room rearrangement.
For those who combine crafting and athletic hobbies, consider dedicating a storage zone in your craft room where you can store or display your custom softball jerseys neatly. A well-designed pegboard, floating shelf, or even a small garment rod can keep your jerseys wrinkle-free and easily accessible. This not only adds personality to your creative space but also helps you switch between crafting and gearing up for the game with ease.
Conclusion
Creating an organized small craft room isn't about having massive space; it's about maximizing what you have with clever DIY solutions. These fifteen ideas prove that creativity extends beyond your projects to how you organize your supplies. Start with one or two solutions that address your biggest pain points, then build your organized oasis gradually. Remember, the best craft room is one that inspires you to create while keeping chaos at bay. Your perfectly organized creative space is just a DIY project away!
Read next: 15 DIY Home Decor Projects to Transform Your Space
Frequently Asked Questions
Q1: What's the most budget-friendly craft room organization solution?
A1: Repurposed mason jars and cardboard boxes with contact paper cost almost nothing but work wonderfully.
Q2: How can I craft in a shared living space?
A2: Use portable solutions like rolling carts and fold-down desks that disappear when not crafting.
Q3: What's the best way to organize tiny craft supplies?
A3: Clear tackle boxes, pill organizers, and baby food jars perfectly sort small items like beads.
Q4: How do I prevent craft rooms from looking cluttered?
A4: Use consistent container types, label everything, and maintain designated homes for all supplies systematically.
Q5: Can I create a craft room without permanent changes?
A5: Yes! Use command strips, tension rods, and freestanding furniture for completely removable organization solutions.
Stay up to date with our latest ideas!